Removing Trinity software and settings
The following instructions are applicable to staff and postgraduates who have had their computer connected to the wired College network in College offices and labs, or to the Staff Wi-Fi network or Staff VPN service, and are either leaving College or for some other reason no longer going to connect the computer to the College network.
Note that some sections apply only to those using Windows, and some apply both to those using Windows and those using macOS. If you need any advice beyond the information provided below then please contact the IT Service Desk.
1. Copy data from College profile (Windows only)
If your Windows PC was connected to the wired network, Staff Wi-Fi or VPN service then it was confirgured to login to the College domain and you will have been logging in with your College username. When you log in with your College username Windows saves certain data to a local 'Profile' folder. This local profile folder includes the default save locations for Downloads, Desktop and Documents unless you change the settings. As you will no longer be logging into the College domain it is advised that you copy the data out of the local profile folder before disconnecting your computer from the College domain (see next section on this page).
To copy data from your College profile:
- On your computer login with your College username.
- Open File Explorer and browse to C:\Users\username where username is your College username. You will see a large range of subfolders here, including Downloads, Desktop and Documents.
- Copy the data from this profile folder to another local profile folder on this computer or an external drive as backup.
2. Ensure you can login with a personal account or Local administrator account
Before proceeding to the next step, make sure you know the login details for another account to be able to sign into this computer. For example, when you setup the device you may have created a personal account, a local Administrator account, or else you can add a personal Microsoft account under Start - Settings - Accounts - Other Users, then under 'Other users' choose 'Add account'.
When you contact us to unenrol your device from Microsoft Intune (the next step) please ask us to check with you that the account you will be signing in with has Administrator access.
3. Unenrolling from Microsoft Intune / Microsoft Defender / Encryption
Please contact the IT Service Desk for assistance in unenrolling your Windows or macOS computer from Microsoft Intune and Microsoft Defender, as well as removing our management of your device encryption.
4. Uninstall other Trinity-licensed software (Windows and macOS)
Many software applications you may have installed during your time using a PC or Mac on the College network are licensed for the use of College staff and students only, or are licensed for your School or Area only. If you are finishing your time in Trinity then it is important that you uninstall any such applications. These would include Microsoft 365 (Word, Excel, PowerPoint, Access, Outlook, Project, Visio), Adobe Dreamweaver, Adobe Photoshop, SPSS, ArcGIS, Matlab, Mathematica, Endnote and more.
5. Remove Trinity Wi-Fi settings (Windows and macOS)
To remove the Trinity Wi-Fi settings, if you are no longer going to connect:
Windows
- On the desktop, click on the Wi-Fi icon on the bottom right hand corner of task bar
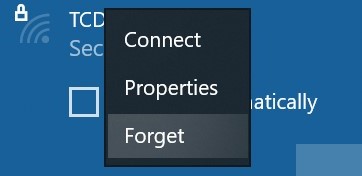
- In the pop up list, right-click TCDwireless, and select Forget.

- On the desktop, click on the Wi-Fi icon on the bottom right hand corner of task bar
- Next click on the arrow to the right of the Wi-Fi symbol for manage WiFi connections
- In the list of WiFi networks, right-click on TCDwireless, and select Forget
macOS
- Click the Wi-Fi status icon in the menu bar.
- Select Open Network Preferences.
- Select Wi-Fi and click Advanced.
- On the first tab, in the list of Preferred Networks, select TCDwireless and click Minus button.

