

HEAnet FileSender - Usage Guide
FileSender is a web-based application, usable by both staff and students, provided by HEAnet that allows the secure sending of large files.
Files are encrypted so transfer is secure, Files are available for download for up to 30 days after sending and can be downloaded an unlimited amount of times over this period. It can be used to send large files internally and externally. Recipients do not have to be affiliated with Trinity College in any way.
It is possible to issue vouchers to external users so that they can send files using FileSender, even though they are not affiliated users. One voucher will enable the specified user to send one file over FileSender service without the need to authenticate with a username and password.
Logging in to FileSender
- Go to https://filesender.heanet.ie/. You can either choose the original FileSender interface or the new FileSender 2 option.
- From the list of organisations, choose Trinity College Dublin
- If you are already logged into Microsoft 365, you will automatically be brought to the FileSender dashboard. If not logged into Microsoft 365, then enter your Trinity username and password to continue.
See the steps below for help using the FileSender service.
Sending files
If you are not already logged into FileSender then go to https://filesender.heanet.ie/ and click Logon and follow the steps above.
Below is the interface you will see after logging into the system.
To send a file please follow the steps under the image.
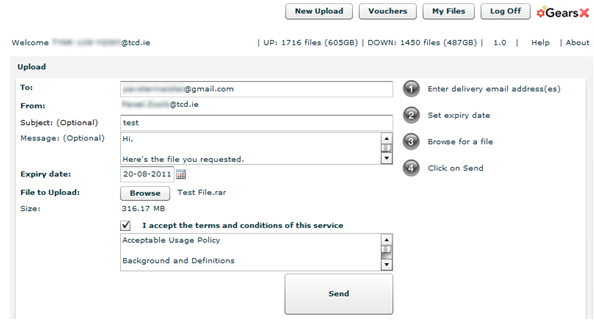
- In the To: field enter the destination email address, or multiple addresses separated by a coma
- In the Subject: field enter a clear subject
- In the Message: field enter a short message
- Set Expiry date as required, this will determine how long the file will be available for download (maximum is 1 month)
- Beside File to Upload click the Browse button and locate and select the file to be uploaded.
- Note that the file cannot have .exe extension. If you wish to send an executable file, you will first have to archive it using WinZip or similar software.
- Note that only one file can be sent at a time. If you wish to send more files, you will need to archive the files using WinZip or similar software.
- Note the maximum file size is limited to 500 GB. (For more information, click the Help link in FileSender towards the top right and scroll down to Configured service constraints.)
- After you attach the file a ‘Send’ button will appear. Check the I accept... box, click on Send and wait for file transfer to complete.
Receiving Files
The recipient will be notified via email that a file is available for download. Note that FileSender notifications may end up in recipient’s Junk E-mail folder. In that case the recipient will need to mark those messages as ‘NOT Spam’.
To download the file:
- Click the Download link in the notification email you received
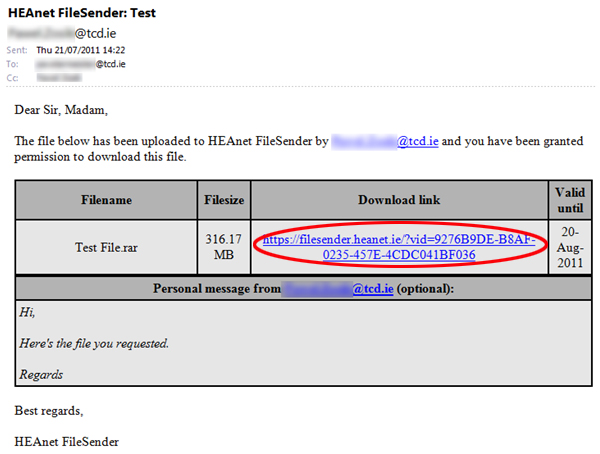
- Click Start download
- Save the file to a desired location
- The sender of the file will be notified via email that the file has been downloaded