

Scanning - Flatbed scanners
In addition to the standard scanning service available on all Datapac print/scan/copy devices in the computer rooms and Libraries, a number of flatbed scanners are available for use by staff and students in the following IT Services Computer Rooms: Hamilton 2, East End, Ussher Library. Step-by-step usage instructions for the flatbed scanners follow below and are also posted beside each scanner station.
Scanning Using the Hp Scanjet 3670
Scanning Text
- On the Start menu, select Readiris Pro8 -- initially an information window will appear. Click on the information window to remove it and you will be brought to the main ReadIris application window, as below.
- Place the sheet of paper face down on the glass of the scanner. Align the page to the top right hand side.
- The Source button on the main toolbar determines whether you are going to use a scanner or a pre-scanned image as the image source. Leave this on the Scanner icon.
- Select Scan from the main toolbar.
- The page is scanned into Readiris Pro 8 (it takes a few minutes), and the image is displayed in the image zone. The page toolbar indicates that a single page is loaded into Readiris, as below:
The image is divided into zones. A colour code indicates the window type: text zones have a yellow border, graphic windows have a blue border and tables a purple border. The arrowed lines indicate the order in which each zone will be read into your output document.
This page decomposition is done automatically when the option Page Analysis is enabled (by default) on the main toolbar. If you disable page analysis by accident, simply click the button Analyze Page in the image toolbar.
Double right-clicking on any part of the text will zoom in so you can have a closer look at the characters. - If more than one page is to be scanned, repeat steps 2 and 3. If you get a message are you ready to delete the current document, clicking Yes will save each page into Word separately, while No will save all scanned pages into a single Word document. The other pages then appear in the page toolbar.
- To save the document click Recognise. At this stage the OCR automatically reads the text without any proofreading. Word will request the document to be named. Give your file a name and select a location to save the file.
- The scanned document is converted to rich text format and opened in Word.
Manually Zoning the Page
- You can zone the text manually with the windowing tools of Readiris. To draw a rectangle around a zone of interest, select the corresponding tool in the image toolbar, click the cursor in the upper left corner of the block of text or image, stretch the selection by moving the mouse to the lower right corner and click again. The zones are automatically sorted in the order of creation: arrows indicate the sort order.
- To modify, move and delete zones, you need to select them first. Select the arrow tool from the image toolbar and click inside the zone. Rectangular markers now appear at each corner and in the middle of the zone sides. To deselect, click the mouse button elsewhere.
- To modify a zone, select it, put the mouse cursor over a marker and drag the side to change the size. To move a zone, select and drag to a new location. To delete a zone, select and choose Cut or Clear from the Edit menu. Cut places it in an internal buffer, Clear erases the zone irretrievably. When you paste zones, they are inserted in their original position and you have to drag them to a new location.
- Manual windowing can be combined with zone/window sorting. You can use the Sort button to include a number of zones which have been automatically selected, and then manually create some more zones. But be aware that as soon as you start creating zones in the “sort mode”, all zones you did not select are erased.
Proof Reading
If you click the Learn button on the main toolbar before you click Recognise, Readiris enters the interactive learning phase. The recognised text is displayed progressively and the system stops on doubtful characters. The doubtful characters are highlighted (unrecognised characters are represented by a tilde "~" symbol) and the following dialogue box appears.
Select Learn to accept a shape which cannot be confused with other characters. Select Don’t learn for symbols which might be confused with others, e.g. a defaced “e” which might be mistaken for a “c”or a damaged “t” which closely resembles an “r”.
Select Delete to eliminate the displayed form from the output. This button is used to ignore “noise” on documents, e.g. spots, pen marks etc. which might be confused with points or commas.
Select Undo to go back and correct mistakes. You can undo the last nine decisions.
Select Finish to abort the learning process, the OCR continues in automatic mode. All decisions by the system thereafter are accepted without user validation.
Select Abort to cancel the recognition phase. No output is generated and you have to begin again.
Scanning Images Using the Hp Scanjet 3670
- On the Start menu, select Adobe Photoshop 7.0.1.
- Select File > Import > hp scanjet 3600 series Twain.
- Note : If the scanner has not been used recently you will see a message warming up the lamp this will take a few minutes.
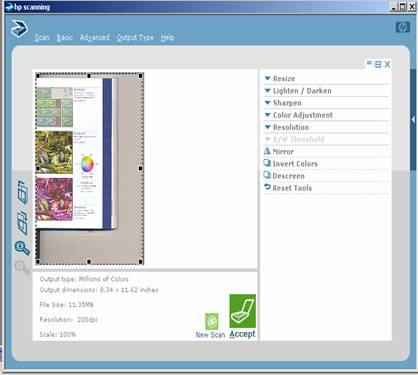
- A HP Scanning dialog box opens and a preview scan will be performed, as below:
- Underneath the scan you will see information about the output type, file size, resolution and scale.
- Click on the blue arrow on the right-hand side of the dialog box. It will expand to show an options pane which allows you to set the quality of the scan: sharpen, resize, adjust colour and resolution.
- Under Output type on the menu bar, you can select colour or black and white.
- Experiment with different settings, noting the changes to the image in the preview window, until you are satisfied with the result
- If the image you wish to scan is only part of the preview, use the mouse to drag a selection rectangle around the image you wish to scan.
- Select Accept to scan the image into Photoshop.
- Your new scanned image opens as untitled in the Imaging window.
- On the File menu, select Save as. Under format, select a file type, Photoshop (PSD, PDD) is the default but you can also save it as tiff, bmp, gif etc. Give your file a name and select a location to save it into.

Note : As scanned images can be quite large it is recommended that you save to filestorage or zip disk.