Staff VPN service guide
The VPN service is a service which works in tandem with your broadband connection. In essence it is an extra piece of software on your computer which provides a secure 'tunnel' connection into the Trinity data network.
If working remotely, what services do I need a VPN for?
If working remotely, you will only need a VPN to access the following services:
- Network files and file storage
- Webauthors making live changes to the webpages using Dreamweaver or attempting to change their webauthor password
- Trinity business applications:
- FIS (if you prepare purchase orders or you are a "preparer" of expenses on iExpenses)
- SITS (client-only, Academic Registry)
- CMIS timetabling
- HR users of SODMS
You won't need a VPN to access lots of other services that are hosted in the 'cloud'. An example would be your email, OneDrive, Teams, Blackboard, Panopto, etc.
VPN service requirements
This service is only available to registered Trinity staff and can only be setup on Trinity-owned computers which are fully compliant with our network security policies including being enrolled in Intune and setup for encryption and Microsoft Defender.
Supported operating systems
For information about which operating systems are supported, please see our 'Requirements' section on the main VPN page.
Supported operating systems list
For the VPN service to work, your computer must already be connected to a broadband service such as wired or wireless broadband in your home or while travelling abroad. Please be aware that your internet connection may slow down very slightly due to the fact that VPN takes up some bandwidth on your connection.
VPN connection request
To request initial connection to the VPN service, fill out the VPN connection request form. Your details will be sent to the IT Service Desk and a ticket will be automatically generated. The IT Service Desk will subsequently contact you to configure your computer for the VPN network and ensure that your computer meets the cyber security criteria to allow the VPN service to be installed on your computer.
Using the VPN service
The steps needed to connect to the VPN service are listed below. The VPN service has multifactor authentication enabled. This means you will be prompted to confirm your identity when connecting.
Connection steps
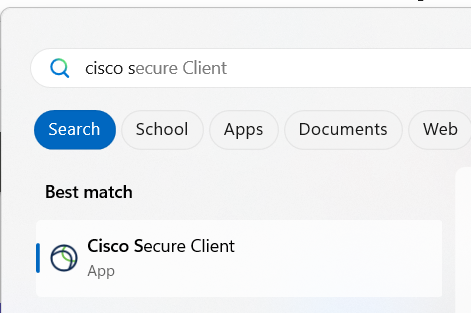
- Click on Cisco Secure Client in the Start menu on Windows or in the Applications folder on macOS.

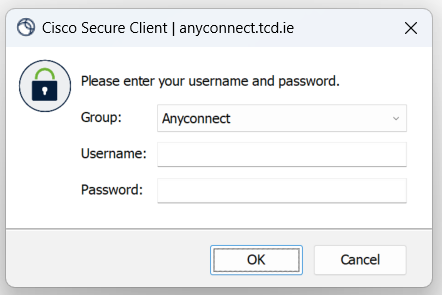
- Under 'Ready to connect' type 'anyconnect.tcd.ie' as below. Click Connect.

- You will be prompted to enter your Trinity username and network login password. Do this and then click OK.

- At this point you will be asked to complete a Multifactor Authentication (MFA) prompt. See our section below for options on the types of MFA prompts.
- Once the MFA prompt has been passed successfully, the connection to the VPN will be completed.
Types of Multifactor Authentication prompts
During the VPN connection phase, you will be prompted to confirm your identity by the method you already use with Microsoft 365 (e.g. phone text code (This text message may be delivered to your built-in text messaging application on your device or your WhatsApp), notification to the Microsoft Authentication App, or a voice call).
The various prompts are outlined below.
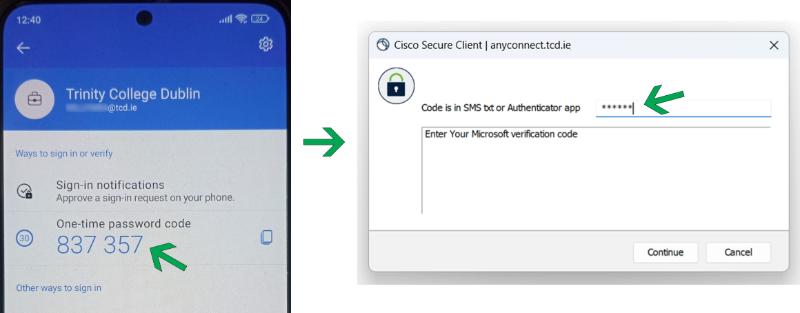
Verification code from the Microsoft Authenticator App
After you get the dialogue requiring you to enter the Microsoft verification code, open the Microsoft Authentication App and use the one-time password code as the verification code.

Phone text verification code
After you get the dialogue requiring you to enter the Microsoft verification code, enter the code which has been texted to your phones' built-in text messaging application or your WhatsApp.
Using a voice call
You will receive an automated call from Microsoft, answer it and press # to complete the process.
Testing and Troubleshooting the VPN connection
If you are experiencing problems getting connected please follow the steps below.
- Check The Connection To Your Internet service provider
- Check your connection to the Internet in general e.g. if you can access web pages and send and receive email then your Internet connection is OK.
- You may need to reconnect to the VPN service if your computer has been dormant or in hibernation mode.
- Check Corporate Firewall settings
- If you are behind a corporate firewall in an external institution and you cannot establish a connection then the local Network Administrators of that institution would need to advise on whether or not port 443 is enabled outbound to the IP address 134.226.254.101.
If you have followed the troubleshooting steps above but require further assistance, please contact the IT Service Desk.

