

How to install Panopto on your own device
The current Panopto desktop recorder doesn't work on the latest versions of macOS (Sequoia and Tahoe). Panopto is developing a new version, but for now, Mac users should use the Panopto Web Recorder, which works in any web browser.
The instructions below outline how to install the Panopto recording software on your own device, including installing through Blackboard on your PC or Mac, and installing on your Android device and iPad or iPhone.
If you are a member of Trinity staff who will not be making material available through Blackboard then the instructions below do not apply.
How to install Panopto on Windows PCs if using Blackboard
The steps below assume that you have already followed the steps to setup Panopto for one or more Modules in Blackboard.
- Log into Blackboard.
- Select one of your modules in your Module List which has been setup with Panopto.
- Click the Lecure Recordings link in the left panel.
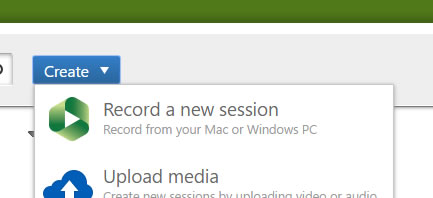
- Click the Create button and select Record a new session.
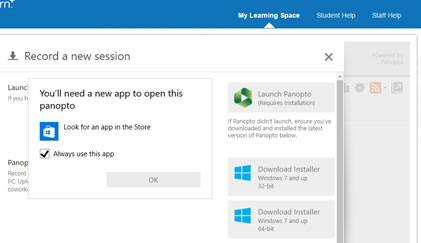
- Select the Always use this app checkbox and then click the relevant installer file on the right, where you will see the links titled Download Installer. Note that there are two downloaders for Windows to choose from, a 32-bit version and a 64-bit version.
If you are not sure if you can install the 64-bit version then you should check if you are running a 64-bit version of Windows: Right-click on the Windows Start button and choose System (you can also access System through the main Windows Control Panel). Your operating system type is displayed in the System type field.
- The downloaded file will be called panoptorecorder.exe. Once the download is complete, double-click on this file to launch it and select OK to any user account authorisation window that may appear.
- The Panopto software requires that you have a certain version of the Microsoft .NET Framework installed. If you do not have this installed, or if you have an older version than the one required, then you will be presented with a message to install the Microsoft .NET Framework before being able to complete the Panopto installation. If the message references the specific version of the Microsoft .NET Framework required then make a note of this. The quickest way to obtain the correct version of the Microsoft .NET Framework for your computer is to carry out a search in Google for your version of Windows. From the search results select the www.microsoft.com listing, download the .NET installation file and then double-click on the downloaded file to install it. Once the Microsoft .NET Framework installation is complete you can proceed with the Panopto installation.
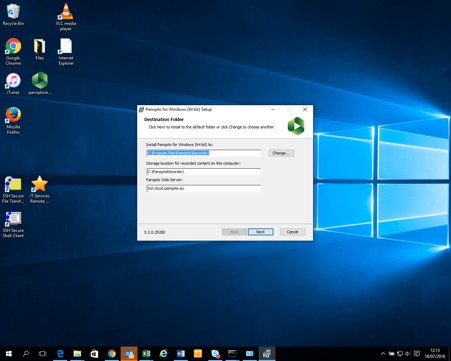
- In the Panopto Setup window, you should note or change to listed 'Storage location for recorded content on this computer'. This folder will be used to save any recordings into which you choose to save 'locally' or when you record in offline mode.
- Click Next and then Install.
After the installation is complete you are ready to record lecture material using Panopto on your own device.
How to install Panopto on Apple Macs if using Blackboard
The steps below assume that you have already followed the steps to setup Panopto for one or more Modules in Blackboard.
- Log into Blackboard.
- Select one of your modules in your Module List which has been setup with Panopto.
- Click the Lecure Recordings link in the left panel.
- Blackboard may show a message stating that cookies are disabled for this website. Click the Safari menu listing in the top left corner, choose Preferences from the drop down menu, click on the Privacy tab and for Cookies and website data turn on Always Allow. Click the Lecure Recordings link in the left panel in Blackboard once more.
- Click the Create button and select Record a new session.
- From the list of installer files on the right choose the listing titled Download Installer, OS X 10.9 and up
- The downloaded file will be called Panopto Recorder.pkg. Once the download is complete, double-click on this file to launch it and select Continue.
- Accept the default installation location and click Install. If prompted then enter your local Mac administrator password and choose Install Software.
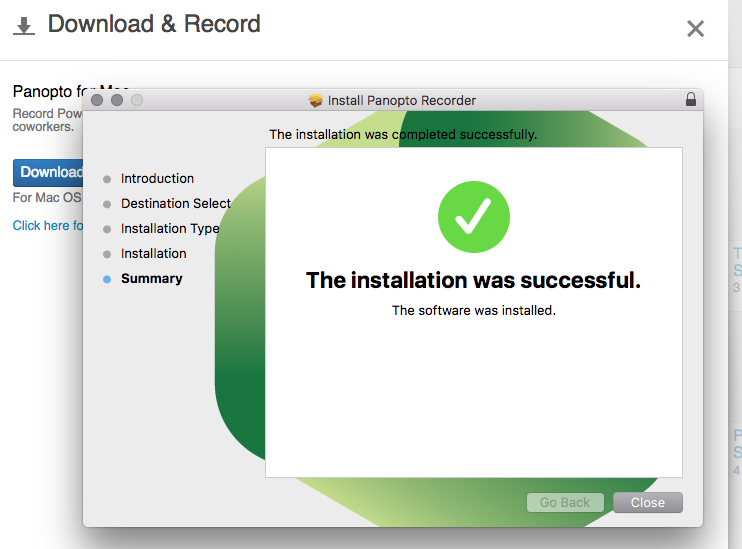
- Once installation is complete click Close.
After the installation is complete you are ready to record lecture material using Panopto on your own device.
How to install Panopto on iOS
The Panopto app allows you to record video content with the camera on your device. It is not possible to record the screen on your phone or tablet with this software. The instructions below outline how to install the app.
- Tap on the App Store icon
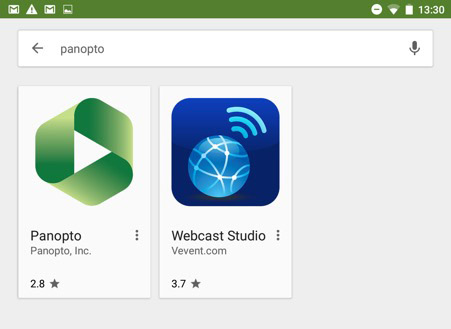
- In the Search field, type the word Panopto
- Tap the Get button or the download cloud icon (cloud icon with down-pointing arrow)
- Tap the Install button (note: if the Open button is available, this means you have already installed the app)
- Tap on the OK button to download
- Tap the Panopto icon on your Home screen
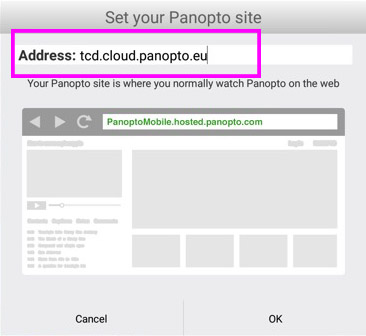
- Type in tcd.cloud.panopto.eu into the address field

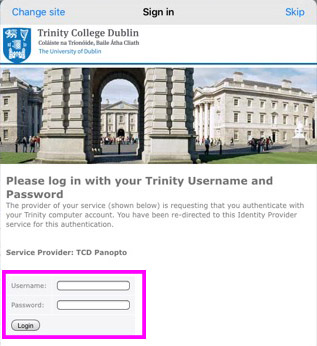
- Click on the Account field and choose the Edugate SSO menu option
- Type in your Trinity credentials (username and password)
How to install Panopto on Android phones and tablets
The Panopto app allows you to record video content with the camera on your device. It is not possible to record the screen on your phone or tablet with this software. The instructions below outline how to install the app.
- Launch the Google Play Store app
- In the Play Store search for Panopto, and tap on the Panopto icon from the returned list
- Tap Install and the app should download and install and your device
- Tap on the Open button when your download is complete

- Tap on the Sign In button
- Type in tcd.cloud.panopto.eu into the Address field, then tap on the OK button
- Tap on the User Sign-In field and choose Edugate SSO from the drop-down menu
- Type in your Trinity computer account credentials (username and password) and tap the login button (after signing-in, the All Sessions window will open)
** Please note that it is not currently possible to record a presentation using Panopto on an Android device.
How to install Panopto on PC via the TCD Panopto Cloud Portal (https://tcd.cloud.panopto.eu)
- Open your web browser such as Google Chrome or Firefox and navigate to the TCD Panopto Cloud Portal at http://tcd.cloud.panopto.eu
- Click on the Sign-in button.
- Click the down arrow and choose Edugate SSO from the drop-down list, click the Sign in button again and type in your Trinity credentials to sign-in.
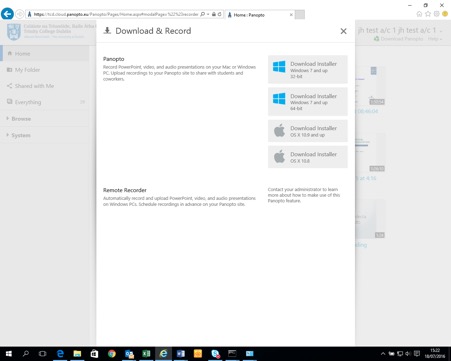
- Once logged in, click on the Download Panopto link under your name in the top right-hand corner of your screen.
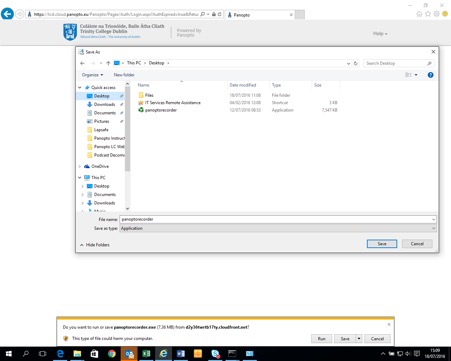
- Click the Save button, click the Save As option and save the file panoptorecorder.exe to your computer’s desktop. Other web browsers may automatically download the file for you, so you just need to find the downloaded file on your screen to run it.
- Click on the panoptorecorder.exe file to run it from your desktop, the user account authorisation window may pop up, if so just click Ok to allow the Panopto installer to run.
- The Panopto Setup window will display. (Note the folder the software will be installed to, also take note particularly of the other two fields, where lecture recordings will be stored locally on your Windows PC and that they will be stored in the Panopto cloud location as well.)
- Click the Next button
- Click the Install button
- The installation will begin and complete.
- Once complete the Panopto logon screen will reappear and a Panopto Application Shortcut icon will also be added to your desktop.
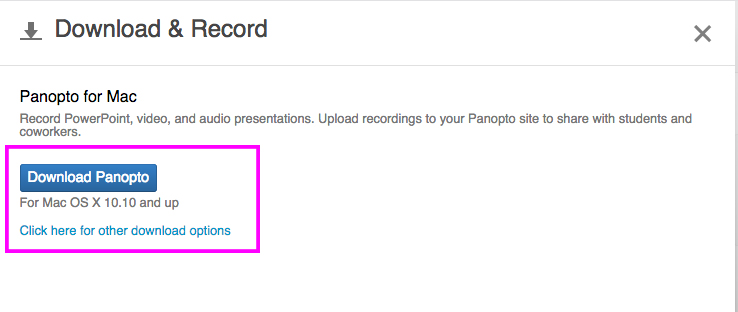
How to install Panopto on Mac via the TCD Panopto Cloud Portal (https://tcd.cloud.panopto.eu)
- Open a web browser such as Safari or Firefox and navigate to the TCD Panopto Cloud portal at http://tcd.cloud.panopto.eu
- Click on the Sign in button on the top left hand corner.
- Click the down arrow and choose Edugate SSO from the drop-down list, click the Sign in button again and type in your Trinity credentials to sign-in.
- Once logged in, click on the Download Panopto link under your name in the top right-hand corner of your screen.
- You'll then be prompted to Save File to your computer
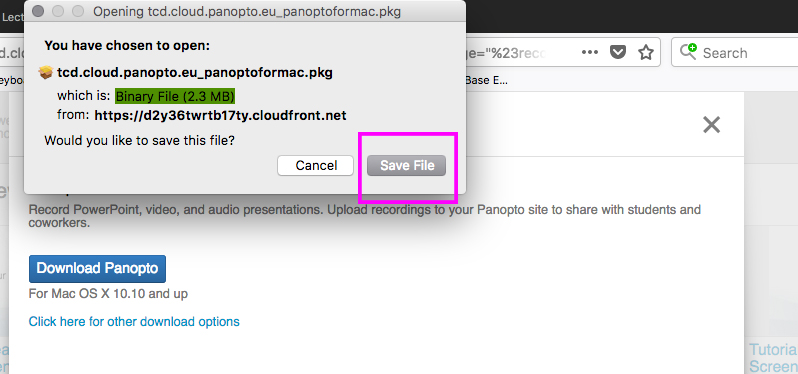
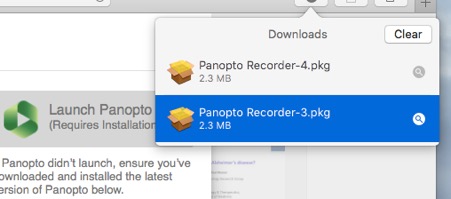
- The Panopto Recorder.pkg will download and will show in the down-arrow in the top right-hand of your web browser. Click on the down-arrow icon and then double-click on the Panopto Recorder download.
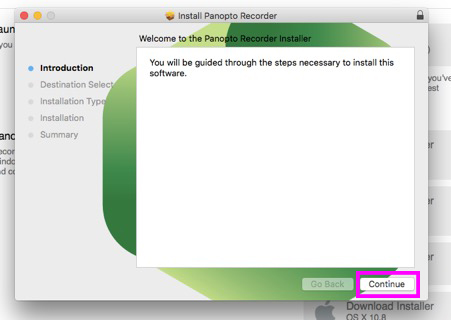
- Click on Continue in the Install Panopto Recorder menu
- Accept the default installation location and click on the Install button.
- Type in your local admin password and click the Install Software button and the Panopto Recorder installation will begin.
- When notified that the installation was successful, click the Close button.
- Now that you have downloaded the Panopto Lecture Capture software, you are ready to begin recording content.