

NAS Data Storage Service - connection instructions
This page will give you instructions to connect your device to a NAS share to which you have been given permissions to access. You must be a staff member or a student of Trinity College to connect to NAS data storage.
You need to be set up with permissions to access NAS. Access to NAS is restricted to Trinity network and staff VPN connection. A group is set up at the outset when you request new NAS for staff needing access and this group is set up with access on the NAS. Requests to add new users to the group with access can be made at any time by contacting the IT Service’s Servicedesk. If a subfolder is to be restricted to a few users the administrator can change the permissions on that folder and it’s subfolders. If you are having difficulty connecting to a NAS data storage folder, please contact the local administrator of that folder.
Setting permissions on subfolders
NAS data storage folder administrators can grant or restrict access to NAS subfolders based on Trinity usernames. The administrators should set the appropriate level of permissions to prevent unauthorised access. For more information, please visit the Managing File Access page.
Windows
To connect from Windows
- On the keyboard, press Windows Logo + R.
- Type the Universal Naming Convention path to your NAS data storage folder in the format \\wincifs01\sampleshare and click OK.
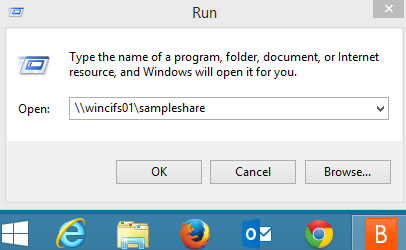
- Your folder is going to be displayed. If you are not connected to the COLLEGE network, you may need to provide your Trinity username and password in order to connect. Type your username in the form College\username, and your network login password.
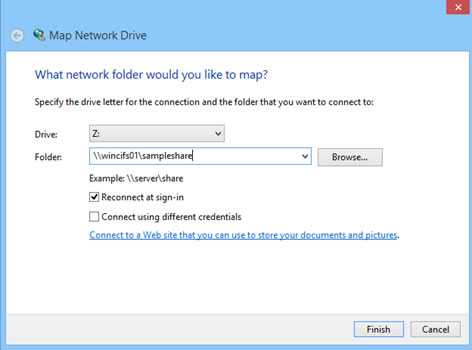
You may choose to permanently Map a drive letter on your computer to this storage folder. In this way it is always available in the Computer menu.
To map the drive
- On the keyboard, press Windows Logo+E to open Windows Explorer.
- Click on the Computer menu in the top left part of the window.
- Select Map network drive.
- Select a drive letter and type the UNC path in the format \\wincifs01\sampleshare
- Make sure you select the Reconnect at sign-in box. This means you will only need to map the drive once.
- Click Finish.
macOS
To connect from a macOS
- In the main menu, click Go and Connect to Server.
- Type the Server Address in the form smb://wincifs01.college.tcd.ie/sampleshare and click Connect. Where wincifs01 is the name of the server or NAS server and Sampleshare is the name of the NAS share/shared folder.
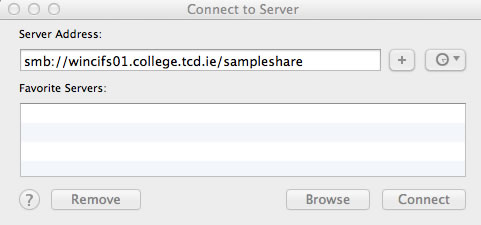
- You will be prompted for your username (i.e., college/username) and network login password.
- After successful authentication, you will see a list of available data volumes.
Linux
To connect from a Linux computer
Please note that the exact steps may differ depending on the version of Linux you are running.
- Locate Connect to Server menu.
- In Service type menu, select Windows share.
- Type the following information:
- Server: e.g. wincifs01
- Share: e.g. sampleshare
- User Name: your Trinity user name in the form college\username
- Domain Name: college.tcd.ie
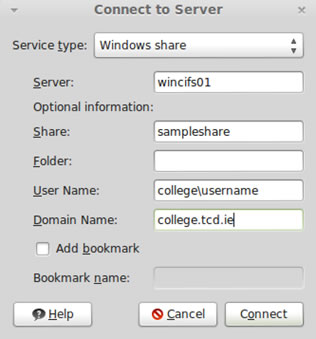
- Click Connect and you will be prompted for your College network login password.
- After successful authentication, you should be connected to your NAS data storage folder.