
Record a video using the Panopto Capture browser application
We recommend that, where possible, you should use this method for recording. The instructions below outline how to record a video using Panopto Capture in your web browser and make it available in your Blackboard module. Panopto Capture lets you easily record from your desk, laptop or mobile device's web browser.
Pre-requisite Steps:
Click below to learn how to install, launch and enable Panopto to record using the Panopto Recorder in a lecture theatre, office PC or personal computer. Before you can use Panopto to record videos in Blackboard, you will need to link the Panopto Lecture Capture Link to each Module that you'll want to record videos for. These steps must be carried out for each Module and will provide you with a link to run the Panopto Lecture Capture Software.
Select your operating system below for instructions
How to record a lecture within a Blackboard module on a Windows PC
The instructions below outline how to record a video using Panopto Capture in your web browser and make it available in your Blackboard module. Panopto Capture lets you easily record from your desk, laptop or mobile device's web browser.
- Log in to Blackboard via Google Chrome if possible - other browsers may work, but Chrome will give the best compatibility with Panopto Capture.
- Select the module from your Module List that you wish to add the recording to - remember that you must have already set up Panopto in your Blackboard module before you can use Panopto.
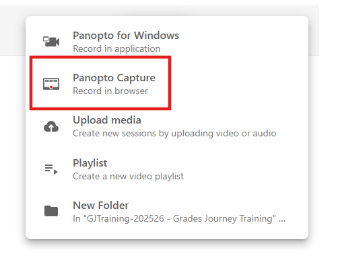
- Click on + Create -> Panopto Capture
- Accept any browser prompts to grant Panopto access to your microphone and webcam. If there is an issue, please see Panopto's page on granting permissions in your browser.
- Click the green Microphone button and select the correct microphone from the list; for example, if using a headset, ensure it is selected and not your webcam's microphone.
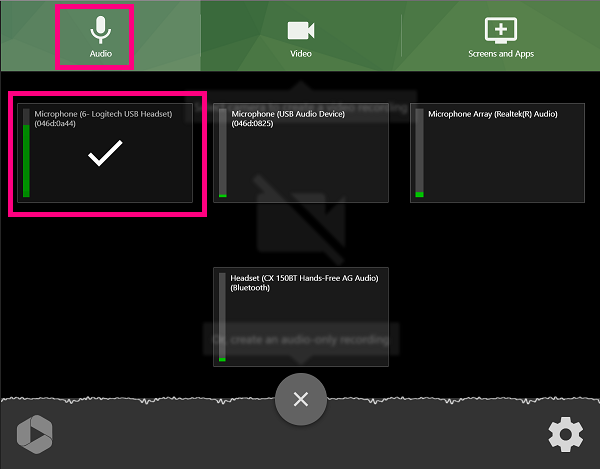
- Then click on the Video icon and select your webcam or camera if you want to record these during the session
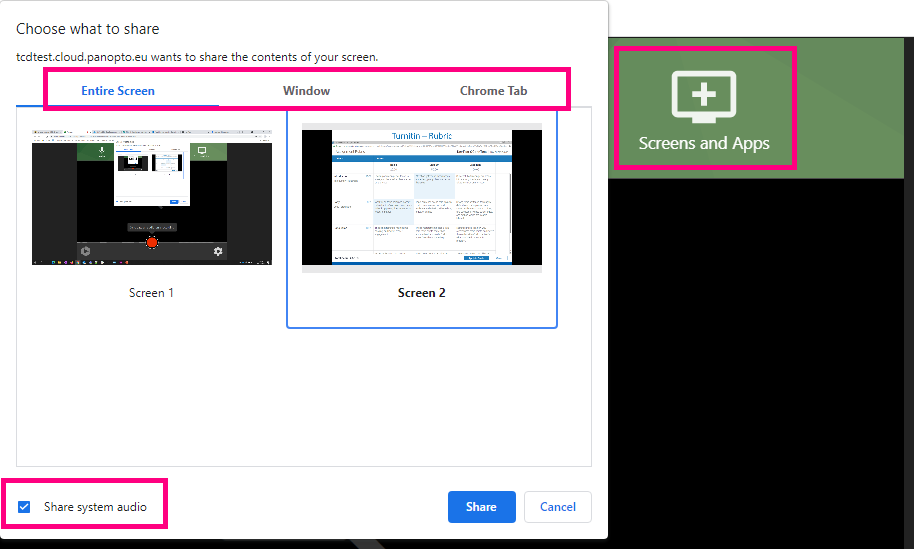
- The next step is to select 'Screens and Apps' and choose what you want to share during the recording. For example, you could share your entire screen or just a specific window, such as a PowerPoint presentation. If you want to share audio from your computer (example - an audio file or video), ensure you select the 'Share System Audio' box when sharing the entire screen
- You can hover over the video streams to select options such as blurring your background if you are using a webcam
- Click on the large record button at the bottom of the screen when you are ready to begin
- Click the button again when you have finished
- Once the recording has ended, you can play it back, edit it, or redo it. If you need to fix a mistake, you can choose Edit instead of redoing the whole recording.
- If you are happy with the recording, enter a title and description, then choose either View or Edit depending on whether you need to make changes
- Note that it takes a few minutes for your recording to be fully uploaded to Panopto. You will get an email to your inbox when it is processed.
- By default, the new lecture recording will be visible to students enrolled in that module when they log in to Blackboard.
- The Share option is required only if you want to share the video with users who are not enrolled in your module.
- Once finished, close the window, and you will see the recording listed in your module's Panopto folder
Below is a Panopto video guide that provides an overview of the process.
How to record a lecture within a Blackboard module on a MAC
- Sign in to Blackboard and open the module you want to record a lecture video in, and click on the Panopto Lecture Capture icon in your module content area to open the Panopto folder.
- Click on the <+Create> button and choose the <Panopto for Mac – Record in Application> option
- Click on the <Open Panopto> button to launch the Panopto Recorder Application
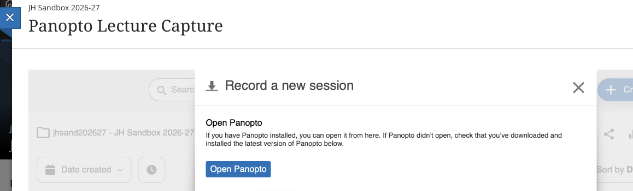
- You may be asked to allow Panopto to do several things via pop-up window prompts on your screen; click Allow in all cases to proceed so that the Panopto Recorder Application opens up.
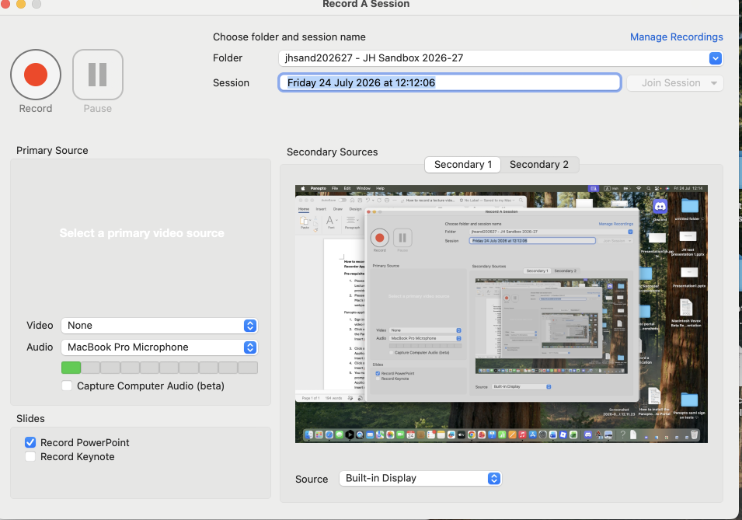
- Now you configure the Record settings :
-
- The <Folder> field where the recording will be stored is already set to the Panopto folder for the current module, so it doesn't need to change.
- The recording <Session> title is the date and time; you may want to change this to a suitable lecture recording title that you and your students will recognise.
- Choose your Video (camera) and Audio (microphone that you want to record with. While you can set your video to none if you don't want your camera view recorded, you have to have an audio mic chosen (for voiceover) to record as a minimum. You can test that the audio mic is being picked up by speaking; the audio bar should move up and down.
- The <Capture computer audio> option should be ticked if you want to capture audio from your computer speakers, as in a YouTube video.
This will only be picked up in the recording if you have this box ticked; in most cases, you can leave it unticked unless you need it for the above purpose.
- For the <Slides> field, tick either < PowerPoint> or <Keynote> to ensure that your presentation slides will be recorded.
- Leave the <Source> field as <Builtin Display>.
- Now you are ready to record, so click the Red Record button and your recording begins
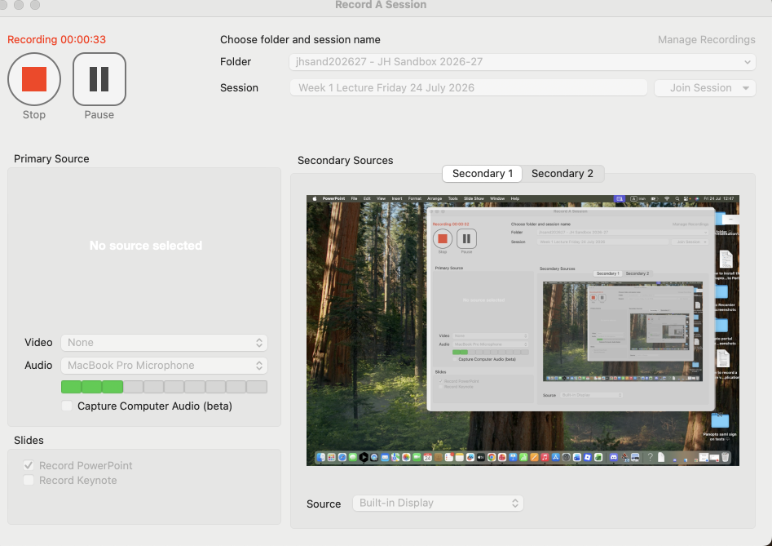
- Now bring up your PowerPoint presentation, talk and walk through your slides via presentation mode and then click <Stop> to finish the recording. Click the <Upload> button to update your recording to the Blackboard module, or else choose <Delete and record again> if you want to record the lecture again if you are not entirely happy with your last attempt.
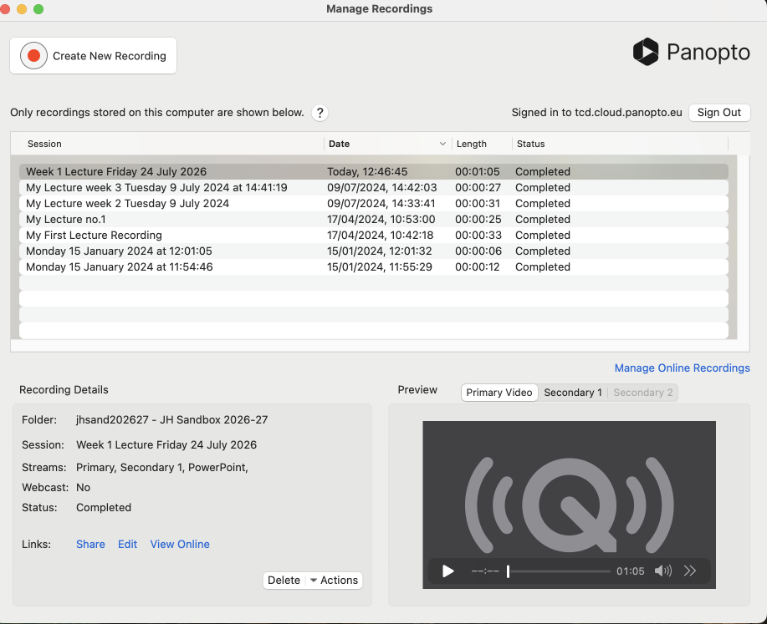
If you are happy with the recording, enter a title and description, then choose either View or Edit depending on whether you need to make changes
-
- Note that it takes a few minutes for your recording to be fully uploaded to Panopto. You will get an email to your inbox when it is processed.
- By default, the new lecture recording will be visible to students enrolled in that module when they log in to Blackboard.
- The Share option is required only if you want to share the video with users not enrolled on your module.
- Once finished, close the window, and you will see the recording listed in your module's Panopto folder