
Trinity student computer accounts
Your Trinity Student computer account, also known as your network login username and password, will allow you to access a host of services on the Trinity network.
All users of the Trinity network are bound by the IT and Cyber Security Policy. The main thing to remember is that you must never give your login details to anyone else - as you are responsible for actions carried out under your account.
Frequently Asked Questions (FAQs)
Check out our "Frequently Asked Questions (FAQs)" page where you will find the answers to the most common questions about student accounts.
Frequently Asked Questions (FAQs)
Existing students
Obtaining your username and initial password
Any registered student can collect a printout of their username and initial network login password during standard opening hours from the IT Service Desk by presenting their student ID card.
Please note that for security reasons usernames and passwords cannot be issued/confirmed by IT Service Desk personnel via phone or email.
Forgotten passwords
If you have forgotten your password, you can reset it via the Microsoft 365 Self-Service Password Reset (SSPR) tool.
Locked account
If you need to unlock your computer account, you can do so via the Microsoft 365 Self-Service Password Reset (SSPR) tool.
After entering your Trinity email address into the SSPR tool, choose the "I know my password, but still can't sign in" option and then follow the prompts to unlock the account.
New students
As a new student, the steps you need to complete to get your computer account and email are as follows:
Part 1: Log in to my.tcd.ie and "Activate your Trinity Computer Account"
To log into my.tcd.ie for the first time, you will need the temporary username and password that was sent to the e-mail address you gave during the College application process.
Once logged into my.tcd.ie:
- Click on the Home menu item
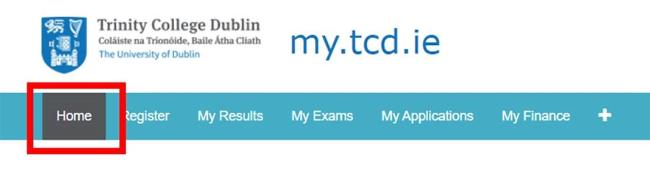
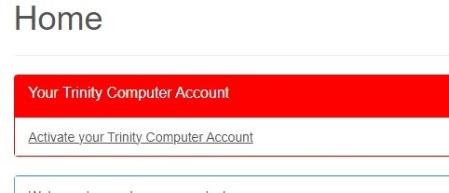
- Under the "Your Trinity Computer Account" section, click on Activate your Trinity Computer Account.
-
Don't see the "Activate your Trinity Computer Account" option? This usually means that your enrolment has not yet been fully processed by Academic Registry. The Activate your Trinity Computer Account task generally becomes available within one day of being fully enrolled.
Alternatively, you may have already completed this step. To check, select "All Intray Messages" and look for a message with the subject "Get Ready for Trinity – set up your computer account now".
If you can see this message, you can proceed with setting up your Trinity computer account using the instructions provided.
-
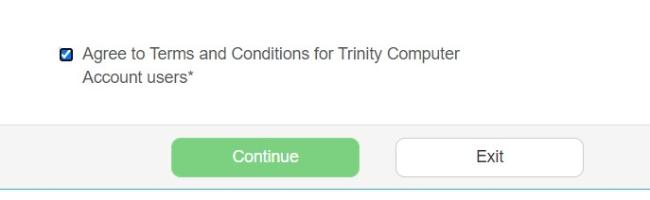
- Tick the box next to "Agree to the Terms and Conditions for Trinity Computer Account users in Trinity" and click Continue
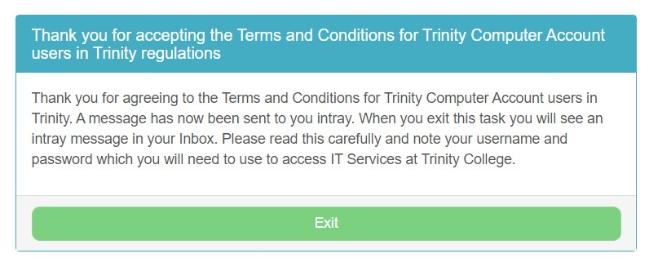
- A window confirming you have accepted the Terms and Conditions will open. Click Exit
- You will then be brought back to the "Home" section of the site. In the "New Intray Messages" section, there will be a new message with the subject name "Get Ready for Trinity: set up your computer account now"
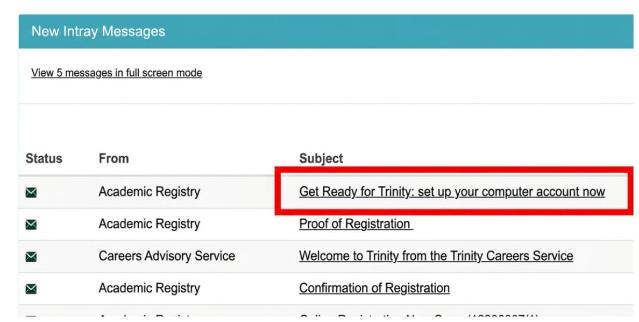
- If you cannot see this message, click the "All Messages" link which will refresh the Intray
- Once you open this message, at the top it will list the following:
- Trinity Computer Account Username
- Initial Network Login Password
- Trinity MyZone Email Address
To proceed with the part 2 of the computer account set up, you will need the Trinity MyZone Email Address and Initial Network Login Password as listed in the message.
New students that previously had computer accounts
If you are a new student, but previously attended Trinity and had a computer account, then rather than use the "Initial Network Login Password" in the Intray message, you should use the last password that you had before you finished your studies.
If you can't remember this password or have issues accessing your account, please contact the IT Service Desk.
Part 2: Log in to Microsoft 365 to complete the computer account set up
Now that you have your Trinity MyZone Email Address and Initial Network Login Password, you can complete the setup in Microsoft 365.
During this process, you will:
Set up Multi-Factor Authentication (MFA)
The MFA setup process begins when you sign into Microsoft 365 for the first time.
- Sign in to office.tcd.ie (Microsoft 365), using your Trinity email address (in the form username@tcd.ie) and password
- You will see a prompt asking you to keep you account secure. Click on Next
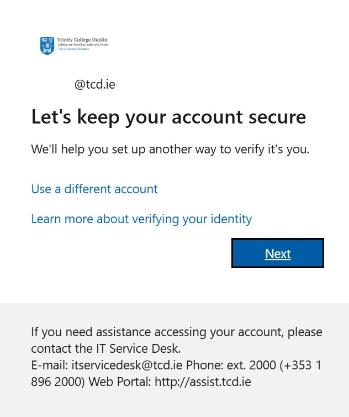
- You will then be presented with the Install Microsoft Authenticator screen. To verify your account, you must install the Microsoft Authenticator app on your phone
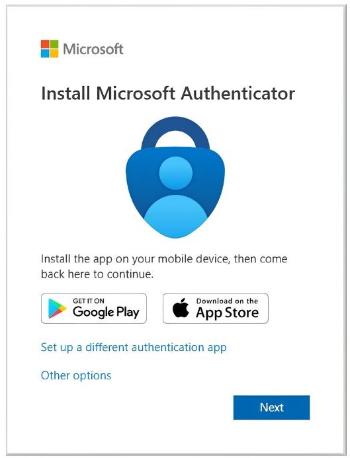
After installing the Microsoft Authenticator app, your options are to verify your account as follows:
- Using only a phone: If you are using only a phone to complete the setup, you can complete the verification process by using the "Microsoft Authenticator App (Pairing)" option shown below.
- Using a computer and a phone: If you are completing the setup on a computer and also have a phone with you, you can complete the verification process by using the "Microsoft Authenticator App (QR Code)" option shown below.
Select the appropriate tab below for the next steps.
MFA authentication options
- After you install the Microsoft Authenticator app on your phone, switch back to your phone browser and click Next
- Click Pair your account to the app by clicking this link
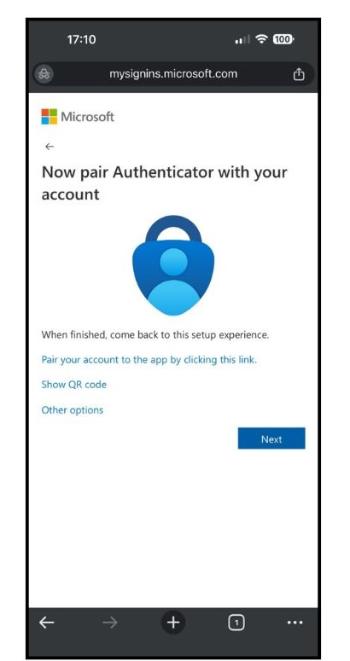
- After clicking the 'Pair your account' link, your Microsoft Authenticator app should automatically open
- At this point, you may be asked for your phone pin code or fingerprint. You may also be asked to allow notifications.
- The 'Account added successfully' message will be displayed and your email account name will show in your Microsoft Authenticator App. Click Ok. Return to your browser window and click Next.
- Microsoft will then display a message saying Let’s try it out, a number will also show on the browser screen.
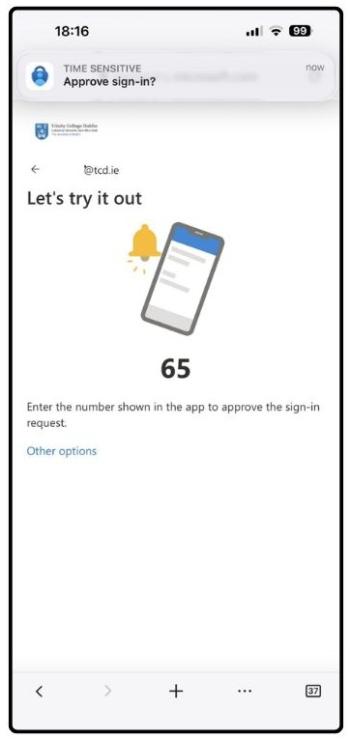
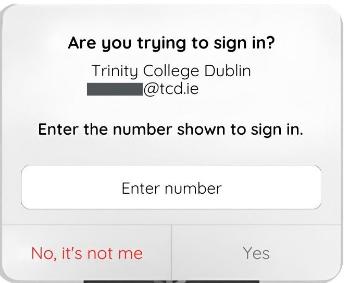
- You should get an automatic prompt from the Microsoft Authenticator asking to Approve sign-in? Click on Approve sign-in and enter the number followed by Yes. Alternatively, you can open the Microsoft Authenticator app and at the Are you trying to sign in? window enter the number followed by Yes.
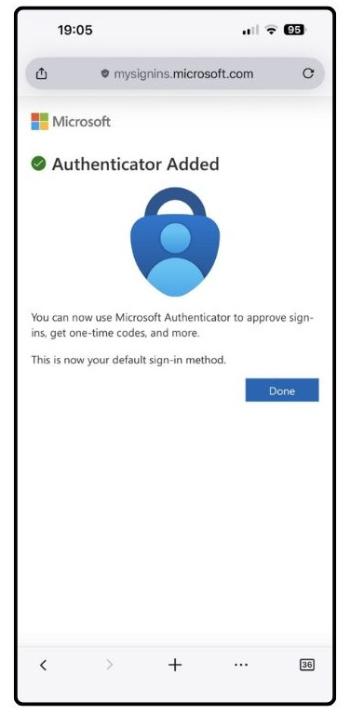
- Now go back to the browser and you should see a message saying Authenticator Added appear in the browser, click Done.
- At the Stay signed in? window you can choose to stay signed in if you want to use your Microsoft 365 apps online.
- After you install the Microsoft Authenticator app on your phone, on your computer choose Next
- Click Next again at the Set up your account in app.
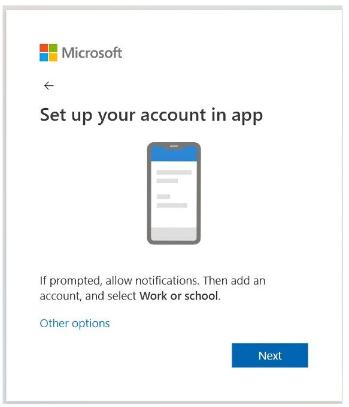
- Once the Scan the QR code screen appears on the computer, open the Microsoft Authenticator app on the phone and follow the steps below:
- Open the Microsoft Authenticator app, tap the + in the top right corner and choose Work or school account
- Select Scan a QR code and point the phone camera at the QR code on the computer screen
- You will then see a notification to say the account is added to the app
- iOS users may have to enable the camera in Settings to scan the code
- If you can't use the phone camera, you can manually enter a code and URL on the app by clicking on the Enter code manually button. The code and URL needed can be found by clicking on the Can’t Scan the QR code? option below the QR code on the computer. Then click Finish.
- Switch back to the computer and click Next.
- Microsoft will then display a message saying Let’s try it out and show you a number on the browser screen.
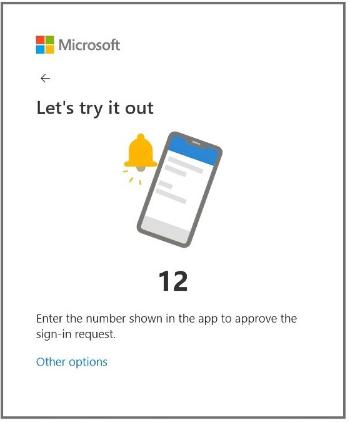
- You should also get an automatic prompt from the Microsoft Authenticator asking Are you trying to sign in? or Approve sign-in. Enter the number shown in the browser screen, into the prompt and then click Yes.
- You may have to enter your phone pin code or fingerprint multiple times as part of this process.
- A message saying "Approved" will quickly appear in the Microsoft Authenticator app.
- Go back to the browser and you should see a message saying Authenticator Added appear in the browser. Click Done.
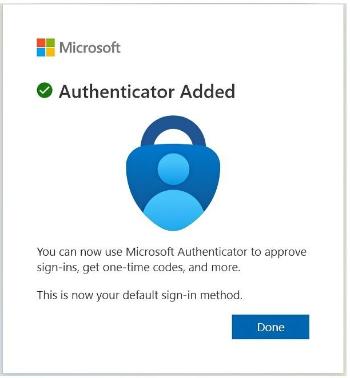
- At the Stay signed in? window you can choose to stay signed in if you want to use your Microsoft 365 apps online.
Update the account password
To update your password, you will need the Initial Network Login Password from the Intray Message.
- After completing the Multi-Factor Authentication (MFA) process above, you will see the Update your password screen
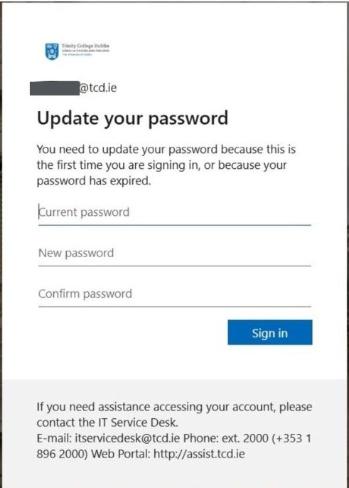
- On this screen enter:
- Your Initial Network Login Password in the Current password field
- Enter a new password of your choice in the New password and Confirm password fields
- Your new password must be at least 8 characters, contain both upper and lowercase characters, have at least one number or special character (but not £ € : ? | space), and not be part of your first name, last name, or username. Your password can only be changed once in a 24-hour period
- Click Sign in
You Trinity student computer account is now setup.
You can use these account details to access a host of services such as MyZone - Trinity student email, Student Wi-Fi, and Blackboard - Trinity's Virtual Learning Environment.
Part 3: Log into your student email (MyZone)
Finally, now that you have activated and set up your computer account, you are ready to log into your student email.
Your student email service is powered by Gmail (Google), and we call it MyZone. Official Trinity communications will be sent to this address, so remember to check it regularly.
To access MyZone, browse to myzone.tcd.ie and sign in using your Trinity MyZone Email Address and the new password you have created above.