
Groups
In your Blackboard module, you can use groups for different purposes, including group discussion, group assignments and releasing content to certain groups.
The Groups management experience has been updated to provide a cleaner layout and more intuitive controls. The updated interface displays more information in less space, making it easier to manage groups and members without excessive scrolling. Instructors now start by choosing how they want to structure groups before managing individual members. The options include: Manual assignment, Automatic assignment, Self‑enrolment and Import with a CSV file.
Watch a video about creating module groups
Blackboard Video Guide on how to create groups
Click here to viewAdditional Resources & Guides
Use this option when you need to select certain students for each group.
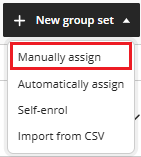
1. Go to the Groups tab in your module and click + New group set and select Manually assign from the list that appears.
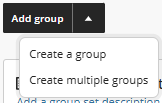
2. Create a group or create multiple groups at once by selecting Add group. You must create your groups first before assigning your students to them.
3. Select the student/s you wish to add to each group from the Unassigned students. You can assign a student to a group in several ways.
-
- Select the + icon to the right of the student's name and choose the group from the list that appears.
- Drag and Drop - hover your mouse over a student's name, then place the cursor to the left of the check box in the pink area. Your cursor will change to a hand, and you can drag and drop a student to the group.
- Select multiple students by ticking the checkbox to the left of their names, then either select the + icon or drag and drop to assign multiple students at once.
- If you need to unassign a student and move them to another group, select the Unassign icon beside the student's name, or unassign all group members from the group, then repeat the assigning steps.
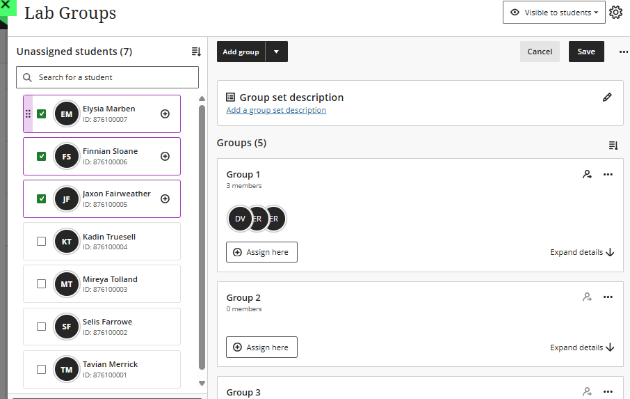
4. Give the Group set a meaningful name at the top left of the screen, and choose whether you want to make the group Visible to or Hidden from. You can also create a Group set description.
5. You can change individual Group names by selecting the ellipsis (three dots) to the far right of the group name.
6. Click Save to save the group set and return to the Groups.
Use this option when you need to mix up the cohort and distribute students quickly and evenly across groups, reducing setup time for large modules.
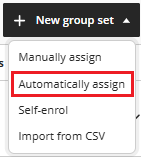
1. Go to the Groups tab in your module, click + New group set, and select Automatically assign from the list that appears.
2. Enter the Number of members per group and then select Enrol members. This will create the groups and randomly assign students to them.
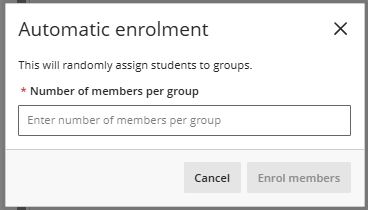
3. Give the Group set a meaningful name at the top left of the screen and choose if you want to make the group Visible to or Hidden from.
4. Click Save to save the group set and return to the Groups.

Use this option when you want to give students the independence to choose their own groups.
1. Go to the Groups tab in your module, click + New group set, and select Self-enrol from the list that appears. 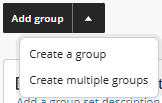
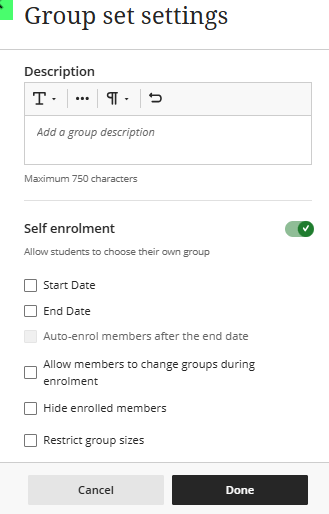
2. A Group set settings panel appears. Here you can set the boundaries and certain options for the Self-enrol groups.
-
- Description - Add a group description
- Enrolment Dates - Choose a Start Date and End Date window for students to join a group.
- Auto-enrol members after the end date - Automatically distribute unassigned students into groups when the enrolment period ends. This feature runs on a schedule and runs overnight, so by the next day any unassigned students will auto-enrol.
- Allow members to change groups during enrolment - Students can switch groups within the enrolment window.
- Hide enrolled members - Enhance privacy by hiding students who have signed up for each group, so they cannot see who's already joined.
- Restrict group sizes - Set the default maximum members per group.
3. Click Done to save your Group-set settings and return to the Group sets.
Please note: Three groups are automatically created with the self-enrol group set. To create more groups within the group set, select Add group and then Create a group. If Create multiple groups is selected, the number of groups you create is added to the three existing groups. You can either delete the original three groups or adjust the number of groups you ask for when entering Number of groups to create.
4. Give the Group set a meaningful name at the top left of the screen,
example, Lab Group Sign-up. Please note: A self-enrol group set is always visible to students.
5. Click Save to save the group set and return to the Groups.
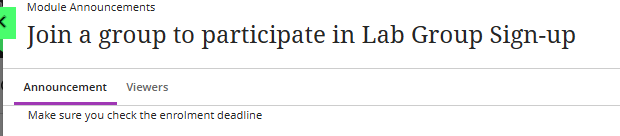
6. An Announcement will automatically be generated in your Blackboard module asking students to join a Group and to check the enrolment deadline. Students will also receive a notification in their Activity Stream.
When managing large cohorts or modules with hundreds of students, you can bulk create groups or add group members in modules by importing a CSV (comma-separated values) file. This feature also allows you to export groups and members to a CSV file.
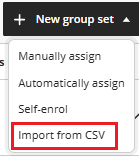
1. Go to the Groups tab in your module, click + New group set, and select Import from CSV from the list that appears.
2. You can download the Group Sets template to fill out the details that you need to import the groups. Visit the Blackboard Help pages for more details on completing the template.
3. Select Upload File to browse and select the completed CSV file.
4. Select Import at the bottom of the panel to import the file.
5. Importing the groups will take some time. You can refresh your screen to check if the groups have been imported. You'll also receive a confirmation email when the Import is complete. The Group Set will appear in the Groups tab in your module.
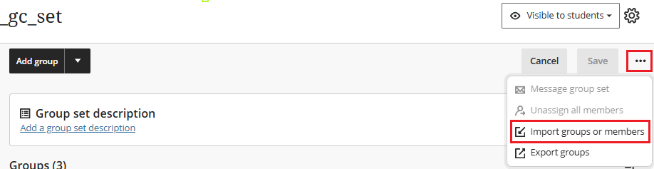
6. Open the imported Group Set and select the ellipsis tool (three dots) at the top right of the page. Choose Import groups or members.
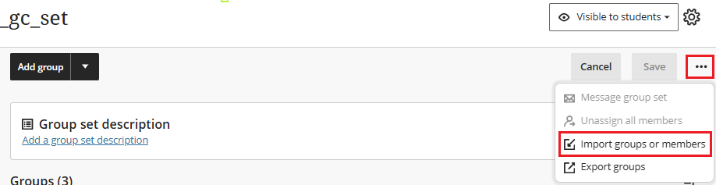
7. Select Assign members. You can download the members template to fill out the details that you need to import the group members. Visit the Blackboard Help pages for more details on completing the template.
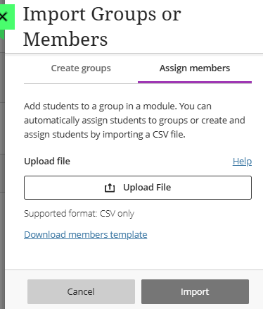
8. Select Upload File to browse and select the completed CSV file.
9. Select Import at the bottom of the panel to import the file.
10. Importing the group members will take some time. You can refresh your screen to check if the members have been imported. You'll also receive a confirmation email when the Import is complete. The members will appear within each group in the Group Set.