
Record a lecture in a Senior Lecturer Pool Room or using your own device using the Panopto desktop application
This guide explains how to capture your screen, audio, and video in Trinity’s Senior Lecture Pool Room lecture theatres or on your personal device. This service is exclusively available to Trinity staff members who are enrolled as an Instructor on a Blackboard module.
Choose Your Recording Tool
You can record your content using one of two methods. To see how they compare, view Panopto’s official Recorder Feature Comparison Guide.
- Panopto Desktop Application (Recommended): Use this for standard recordings in SLP lecture theatres or on your own device.
- Panopto Capture (Browser-Based): Record directly through your web browser without downloading any software.
Instructions
Depending on your operating system, please select the relevant option below to view the instructions for your device:
How to record using Panopto in Blackboard for Windows PCs
- Log in to Blackboard.
- Select the Module from your Module List that you wish to record a lecture to - remember that you must have already setup Panopto for your Module in Blackboard before you can use Panopto for the first time in that Module.
- Click your Panopto Lecture Capture link that you created for this Module and then choose Create, and then Record a new session.
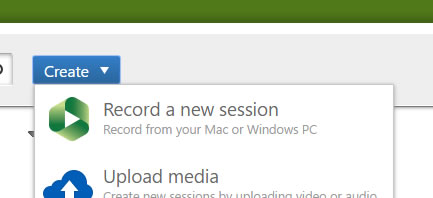
- Click Launch Panopto - the Panopto app will open on the 'Create New Recording' tab.
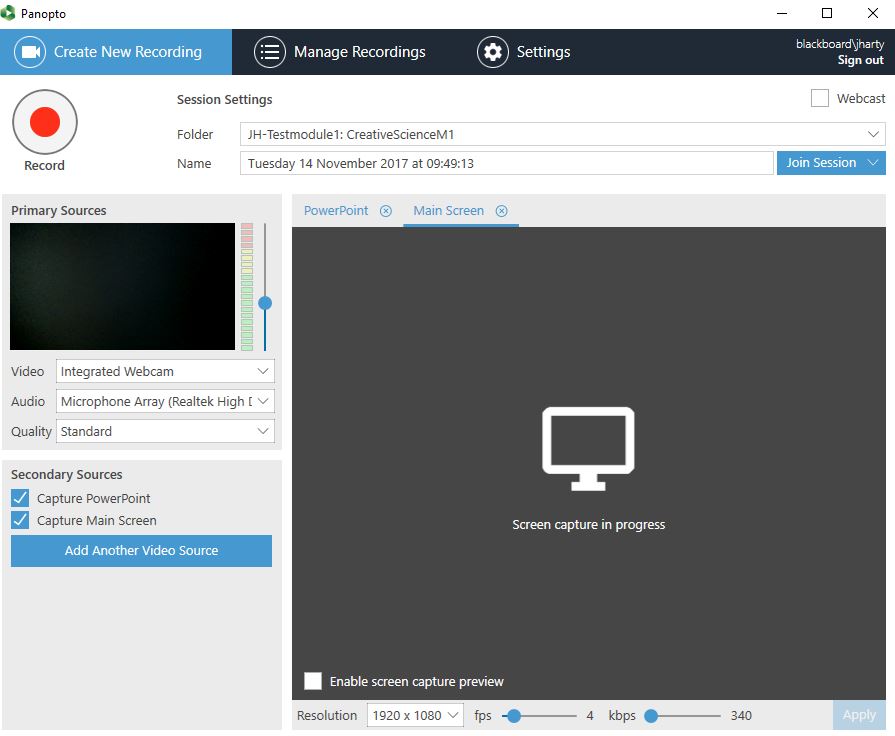
- On the above screen, you can see the Folder that the recording will be listed under for that Module.
- Beside Name, enter a sensible name for this recording session.
- On the left, you will see that 'Capture Main Screen' is selected by default, meaning that all actions carried out on the computer screen will be recorded.
- Under Primary Sources, Video would refer to additional video devices and would be left off.
- Usually, Audio is already selected to record audio through the mic, and you can set a Quality level.
- You can select to 'Capture Computer Audio' if you wish to record audio generated by applications you use during your recording.
- There is a 'Webcast' option towards the top right that generates a web address you can share with anyone who is not present but who you wish to see the presentation as it happens.
- Record & Pause: Click Record to start; use Pause as needed during the lecture.
- Stop & Review: Click Stop when finished. Select Upload (or delete to record again) to save it to the TCD Panopto Cloud storage location. A copy is also stored on the local Windows computer.
- After choosing Upload, the Manage Recordings window will display, showing you a historical list of recordings, with the most recent at the top.
- Note that it may take a few minutes for your new recording to be fully uploaded to the TCD Panopto Cloud. When this process is complete, you will also receive an email to your Trinity email account to confirm the video has been uploaded successfully.
- By default, the new lecture recording will be viewable to students enrolled in that module when they log in to Blackboard.
- The Share option is required only if you want to share the video with users beyond the students enrolled in your Module.
How to record using Panopto in Blackboard for Apple Macs
- Log in to Blackboard.
- Select the Module from your Module List that you wish to record a lecture to - remember that you must have already setup Panopto for your Module in Blackboard before you can use Panopto for the first time in that Module.
- Click your Panopto Lecture Capture link that you created for this Module and then choose Create, and then Record a new session.
- Click Launch Panopto. As the software is already installed on the Senior Lecture Pool Room computers, you can ignore any 'installation required' message that may appear.
- The Panopto Recorder window opens:
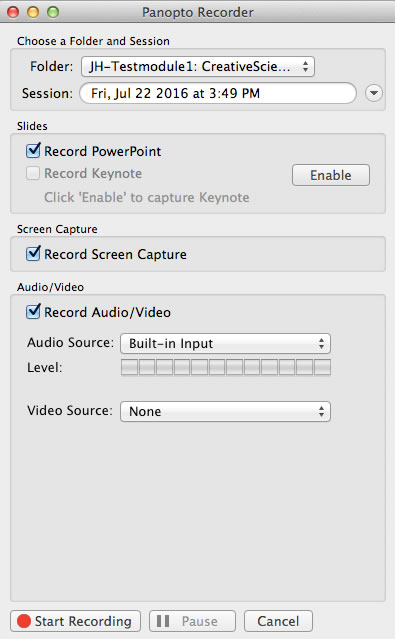
- Beside Folder, you will see where the recording will be saved.
- Beside Session, you should enter a sensible name for this recording session.
- Under Screen Capture, you will see 'Record Screen Capture' selected, meaning that all actions on the computer screen will be recorded.
- Under Audio/Video, you will see that the listing for Audio Source is set to 'Built-in Input', referring to the lecture theatre mic
- Video Source refers to video beyond the screen capture, such as a webcam, and is usually set to 'None'.
- Once you are ready to record, click Start Recording, and when finished, choose Stop Recording.
- If you are not happy with the recording, you can choose Delete. Otherwise, it will take 1-2 minutes to upload the video to the TCD Cloud Panopto site, and you will receive an email to your Trinity email account once the upload is complete.