Quick Start Guide for Staff
If you are a new staff member or want to know the basics, this page will give you an overview of the following steps:
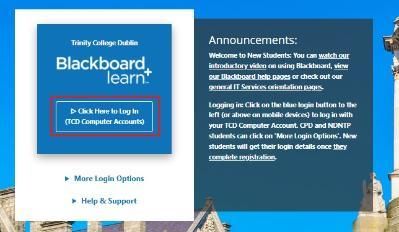
1. Accessing Blackboard
Blackboard can be accessed via mymodule.tcd.ie using your Trinity username and password.
2. Viewing your Module List
After logging in to Learn Ultra, you should see Modules on the left-hand side of the blue menu.
Select Modules to view a list of your modules. You can view your modules in either a list or a grid format. To swap between the two views, select the list/grid icon at the top left. In the image below, the grid view is selected.

You also have the option to search, filter or display selected courses.
Quick Tip: Select the star icon on a module that you access regularly. The module will be placed at the top of the list with a purple star on the bottom right. You can unfavourite a course by selecting the star icon again.

Click to Learn more about Module Lists from Blackboard
3. The Sections Inside Your Ultra Module
When you log into your Ultra module, you will see three main areas within the module interface:
A. Details and Actions - menu on the far right
B. Navigation bar - at the top
C. Module Content - middle area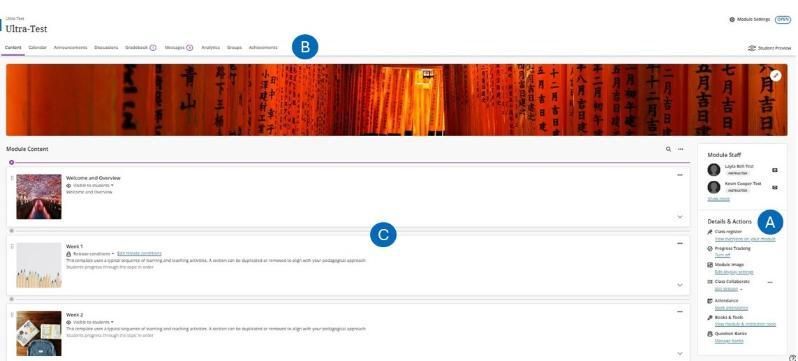
A. Details and Actions
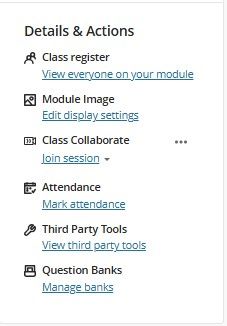
Class Register: View your class register. Enrol other instructors or teaching assistants here.
Module Image: You can add a module banner image to personalise your course. Your image is displayed on the Module page and as the thumbnail for the module card in the base navigation module list.
Class Collaborate: If you're using Class Collaborate sessions, you can access them from here.
Attendance: You can mark attendance.
Third Party Tools: Access third-party tools like Panopto, Turnitin, Talis MyReading List, Grades Journey, and Blackboard Ally.
Question Banks: Create a database of reusable questions for multiple assessments. You can create new question banks or import existing ones to use in your modules.
B. Navigation bar

Open frequently used pages in one step. Select a page to access Blackboard help.
Content, Calendar, Announcements, Discussions, Gradebook, Messages, Analytics, Groups, or Achievements.
- Content – Add, edit and view Module content.
- Calendar – Manage Module: Lecture timetables are located on the left navigation in the Base Navigation.
- Announcement – Send/schedule announcements (including email copies).
- Discussions – A Quick and easy way to access/view/respond to all discussions in your module.
- Gradebook – Assess and manage all module assessments.
- Messages – Send, view, and respond to Module messages.
- Analytics – View Analytics and reports.
- Groups – You can group your module's students for assignment work, tutorials, and other purposes.
- Achievements - We don't use Achievements in Trinity.
C. Module Content
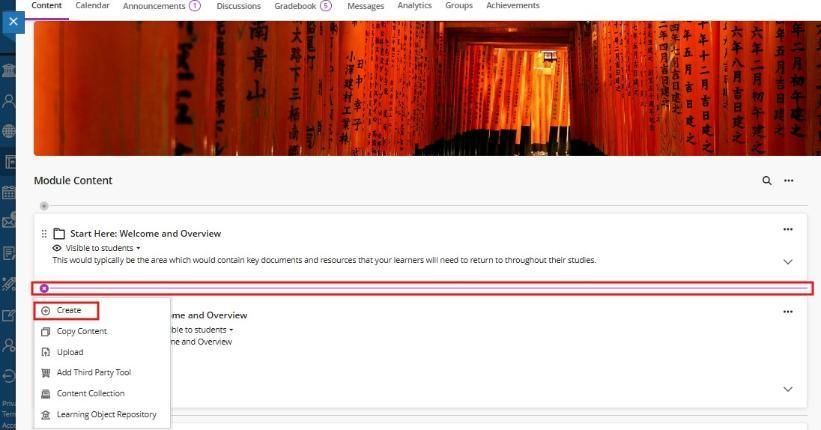
This is where you create and organise your module content. Click the purple plus icon wherever you want to add content; the icon will appear on any line within the Module Content area.
4. Learning Topics
Learning topics can be used as containers for organised collections of content, allowing students to navigate from one content item to the next without distractions or extra clicks.
You can add these items to a learning topic
- Documents
- Files
- Tests and assignments
- Folders
- Multimedia
- Links to websites, discussions, and journals
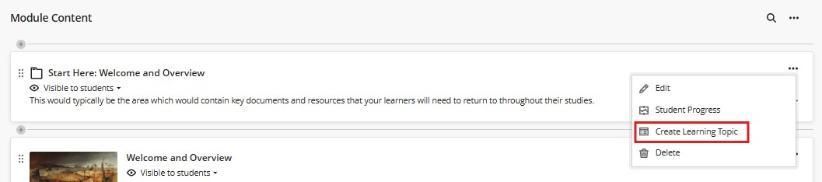
Create Learning Topics
Select the plus button to add a learning module wherever you want. In the menu, select Create to open the Create Item panel. Select Learning Topic.

- Select the Visibility of the Learning Topic.
- Enter a Name and Description for your Learning Topic, clearly outlining what it will contain.
- To determine whether students will view the Learning Topic's content in sequence, select Advance in Sequence.
- Add a thumbnail image (optional) by scrolling to the bottom of the options menu and selecting Add Image.
- Select Save
Note: You can also create a learning topic by converting a folder into one. Click on the ellipsis and then select Change to Learning Topic.
A learning topic can include a range of content items, such as folders, documents, files, tests/assignments, videos, links to websites, content within your module, third-party tools like Panopto and Turnitin, discussions, and journals.
- Click the purple plus icon and add a content item
- Use your mouse to drag and reorganise items
- Click ellipses to edit or delete items
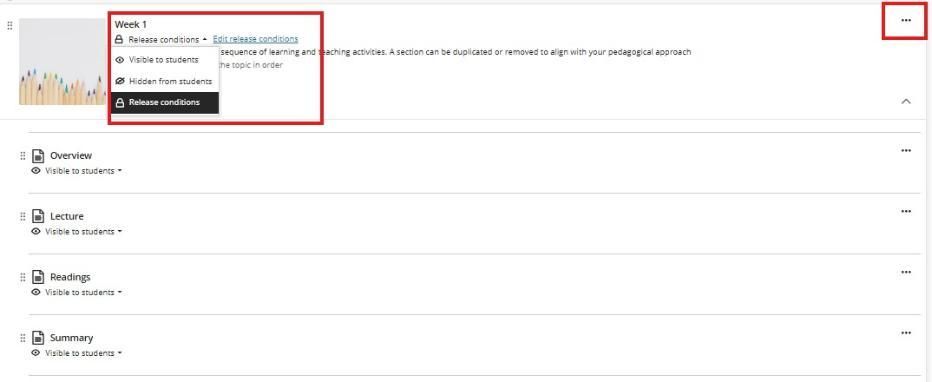
- Set the Visibility and/or Release Conditions
Click to Learn more about Learning Topics from Blackboard
5. Release Conditions
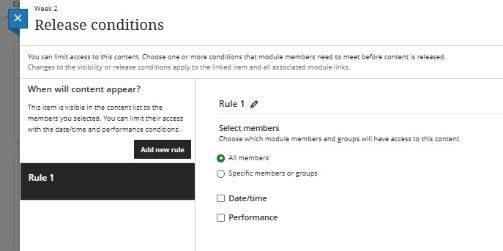
Use release conditions to define when students can view and access module content.

With release conditions, you can set a combination of these rules:
- Which module members or groups have access?
- When the module content is accessible, visible, and hidden using dates.
- What student performance is required, such as submitting an assignment or scoring above a grade/mark on a test?
Click to Learn more about Release Conditions from Blackboard
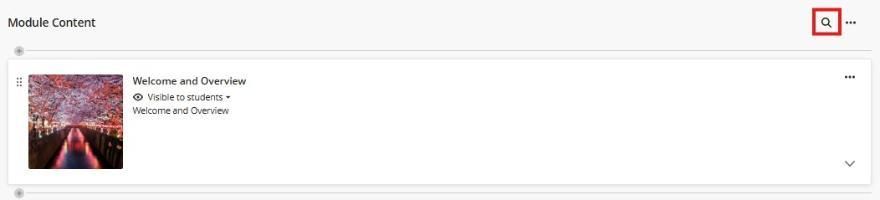
6. Module Content Search
On the Module content page, you can search for items by name. Be sure to have a good naming convention for your materials. To expand the search field, select the Search Module content button, which appears as a magnifying glass.
Click to learn more about Module Content Search
7. Navigating Learning Modules
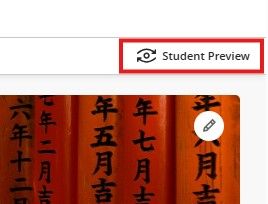
To view or test your content, click "Student Preview" located at the top right corner of the page. This will launch the module into StudentPreview mode.
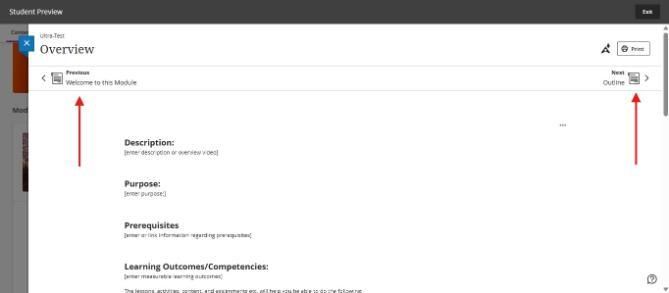
Click an item like a folder or an Ultra document in the learning topic, use the arrows (at the top right /left) to navigate and view the module content.
To exit Student Preview, click the student icon in the top right corner and select Exit Preview.
Click to learn more about Navigating Learning Modules
8. Creating and Structuring a Document
In Blackboard, you can use a document to present a combination of content.
To create a document, click the purple plus sign and select document from the right-hand panel.
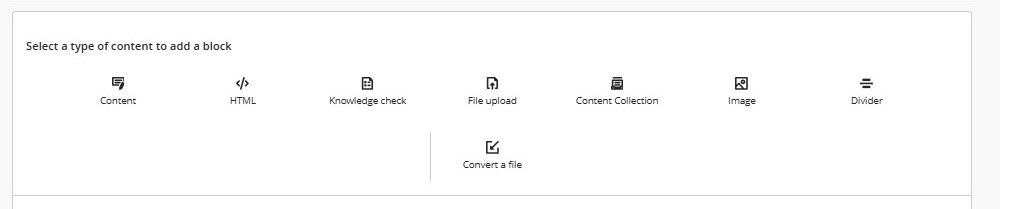
Give the document a title. Use the following options to build your content:
- Add Content - use the rich text editor to add text, links, images/files, & embed third-party tools like Talis Aspire reading list and Panopto
- Add HTML - embed an inline HTML into the editor
- Upload from Computer - browse and add files from your computer.
Additional items have been added to the toolbar:
- Knowledge Check - use this to add a quick check question to test a student's knowledge of the content. This can be either a multiple-choice or a multiple-answer question.
- Content Collection - materials can be added from other modules, as they are stored in the content collection.
- Image - add an image. You can upload an image from your device or choose stock images from Unsplash. You can also choose to caption images or add alternative text.
- Divider - to add a divider between blocks.
- Convert a File - Files such as PowerPoint presentations or Word documents can be converted into Blackboard documents. This means that materials that you have previously created can be quickly incorporated into your module learning materials.
Click to learn more about Documents and Content Items from Blackboard
Addition Information on Creating Content
Click here for additional guides available on Creating Content in your Ultra Module.
- How to create Learning Modules, Folders and Documents.
- How to Organise Content and Activities within Blackboard Using Learning Topics, Folders, and Documents.
Need Further Help?
Contact the IT Service Desk by one of the following methods.
You can email the service desk at itservicedesk@tcd.ie. Please ensure you fill in the 'Subject' field with Ultra: when emailing.
Service desk opening hours are:
Monday - Friday: 09:00 - 17:00