Creating content in your Ultra Module
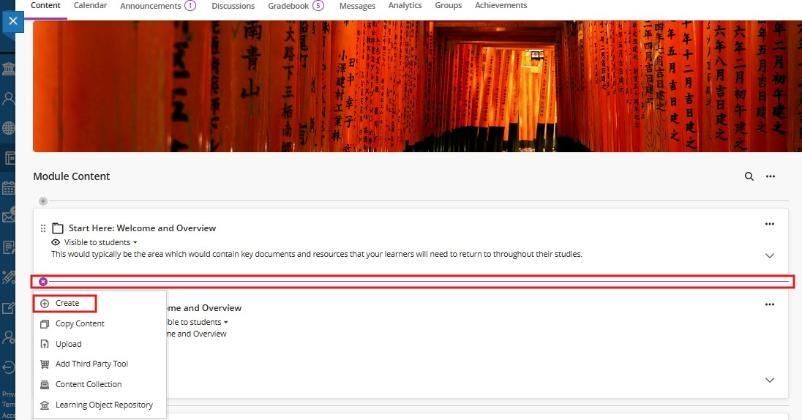
Within the Module content area, you create and organise your module content. Click the purple plus icon wherever you want to add content; the icon will appear on any line within the Module Content area. You can also expand or create a folder or learning topic and add content. Create new content, upload existing content, or add content from external sources or another module. You can choose the content type you want to add.
Learning Topics
Learning topics can be used as containers for organised collections of content, allowing students to navigate from one content item to the next without distractions or extra clicks.
You can add these items to a learning topic
- Documents
- Files
- Tests and assignments
- Folders
- Multimedia
- Links to websites, discussions, and journals
Resources for Creating Content in your Ultra Module
How to create a Learning Topic
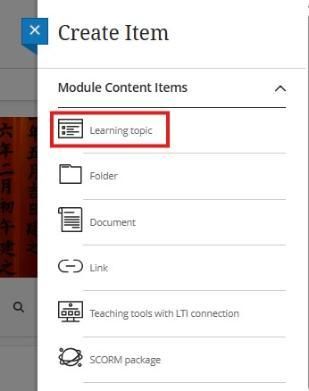
Select the Purple plus button wherever you want to add to your Ultra module. In the menu, select Create to open the Create Item panel. Select Learning Topic.

- Select the Visibility of the Learning Topic.
- Enter a Name and Description for your Learning Topic, clearly outlining what it will contain.
- To determine whether students will view the Learning Topic's content in sequence, select Advance in Sequence.
- Add a thumbnail image (optional) by scrolling to the bottom of the options menu and selecting Add Image.
- Select Save
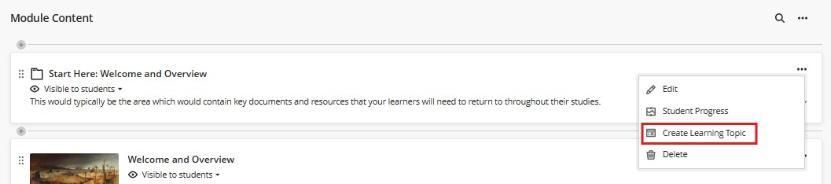
Note: You can also create a learning topic by converting a folder into one. Click on the ellipsis and then select Change to Learning Topic.
A learning topic can encompass a range of content items, including folders, documents, files, tests/assignments, videos, links to websites, content within your module, third-party tools such as Panopto, MyReadingList and Turnitin, discussions, and journals.
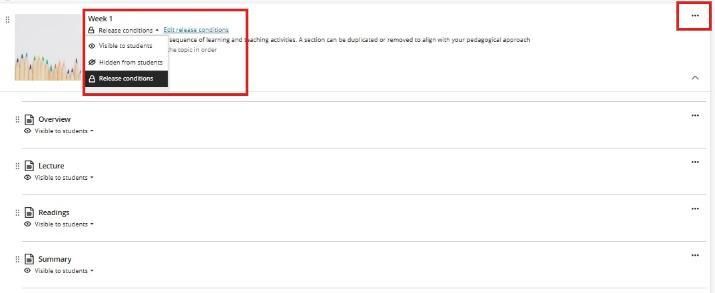
- Click the purple plus icon and add a content item
- Use your mouse to drag and reorganise items
- Click ellipses to edit or delete items
- Set the Visibility and/or Release Conditions
How to create a Folder
Select the Purple plus button wherever you want to add to your Ultra module. In the menu, select Create to open the Create Item panel. Select Folder.
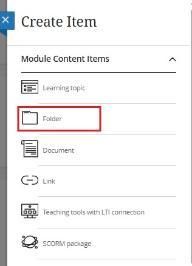
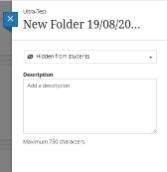
- At the top of the panel, add the name of your folder
- Change the setting to Hidden from students at this point or later when you are ready to release
- Add a Description – The description appears beneath the display name on the Module Content page. This is where you can provide students with more information about the item. The maximum length of a description is 750 characters
- Save
Important note: A folder cannot contain a Learning Topic.
When Progress Tracking is enabled, folders can only be marked as completed if all items within them are completed.
Creating and Structuring an Ultra Document
Click the purple plus icon wherever you want to add content; the icon will appear on any line within the Module Content area. Click on Create and then Document.
In Blackboard, you can use a document to present a combination of content.
To create a document, click the purple plus sign and select document from the right-hand panel.
Give the document a title. Use the following options to build your content:
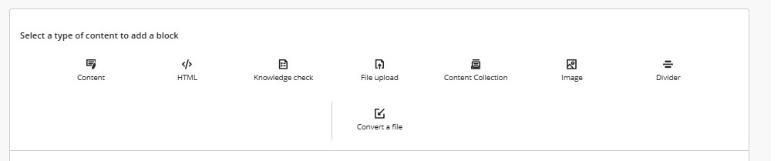
- Add Content - use the rich text editor to add text, links, images/files, and embed third-party tools like MyReadingList and Panopto
- Add HTML - embed an inline HTML into the editor
- Upload from Computer - browse and add files from your computer.
Additional items have been added to the toolbar:
- Knowledge Check - use this to add a quick check question to test a student's knowledge of the content. This can be either a multiple-choice or a multiple-answer question.
- Content Collection - materials can be added from other modules, as they are stored in the content collection.
- Image - add an image. You can upload an image from your device or choose stock images from Unsplash. You can also choose to caption images or add alternative text..
- Divider - to add a divider between blocks.
- Convert a File - Files such as PowerPoint presentations or Word documents can be converted into Blackboard documents. This means that materials that you have previously created can be quickly incorporated into your module learning materials.
To add text to a document:
- Open or create the Ultra document.
- Click Edit Content to open the text editor.
- Click the purple plus and click on Add Content block
- Or hover over a block of existing text and select the purple ‘pen‘ icon.
- Type directly into the text editor, and basic editing tools are displayed along the top of the text editor.
- Click Save to complete.

To add a file as an attachment, e.g. Word Document, PDF, JPG, MPEG file within a document:
- In the text editor, place the cursor where the document is to be displayed.
- Click the Attach button on the toolbar.
- In the Browse window, navigate to the file, select it and then click Insert.
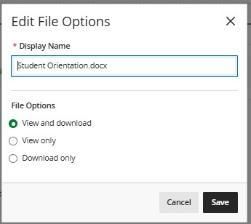
- Edit File Options - Set the document's access level to 'View and download', 'View only', or 'Download only'.
- Click Save.
Document menu bar
The menu bar remains in view as you scroll the Document to view, add, or edit content. The menu bar contains the Edit option when in the view state. After selecting Edit, the menu bar displays the following options:
- Edit
- Add Blocks
- Undo/Redo
- Cancel
- Save

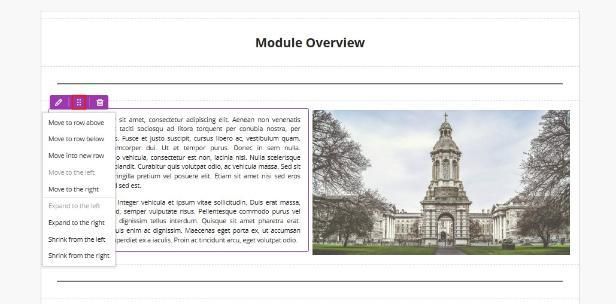
Resizing and moving blocks
You can create appealing layouts by resizing and dragging/dropping blocks into columns and rows.
- Each row includes a menu with options to move or delete the block.
- Each block includes a menu with options to edit, move, resize, or delete the block.
Click to learn more about Documents and Content Items from Blackboard
What are Knowledge check questions in an Ultra document?
Knowledge check questions are single multiple-choice questions that can be inserted into Ultra documents, which enhance the learning experience for your students. They also allow students to engage with content, and Instructors are also given insights into students' responses.
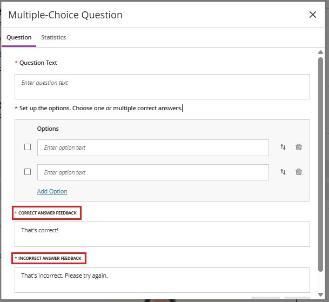
- Question Types: Multiple choice and multiple answer questions
- Feedback: Correct and incorrect answer feedback can be created by Instructors
- Student Interaction: Students can select an answer and submit it. They receive immediate feedback on whether their answer is correct or incorrect.
- Knowledge checks allow unlimited attempts.
- Knowledge checks can't be used as part of the assessment.
Uploading a file to your Module Content Area
Click the purple plus icon wherever you want to add content; the icon will appear on any line within the Module Content area.
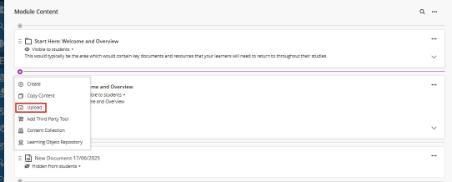
- Click on Upload. Browse for files on your computer.
- Click the Attach button on the toolbar.
- In the Browse window, navigate to the file, select it and then click Insert.
- Edit File Options - Set the document's access level to 'View and download', 'View only', or 'Download only'.
- Click Save.

The files will appear in the content list. Supported file types include DOC, DOCX, HTM, HTML, MP3, MPG, PDF, PPT, PPTX, XLS, XLSX, RTF, TXT, ZIP, and most image types.
Adding Images to your Learning Topic
You can customise your module by uploading an image as a Learning Module thumbnail. Adding images can increase interest and engagement with your materials, as well as help students identify relevant content more easily.
To add an image to a Learning Topic thumbnail:
- Click the three dots on your Learning Topic. Click edit on the panel that appears.

- A side panel will open; scroll down to the section entitled 'Image'. You can click on either Add image or the image icon to open the upload image panel.
- Once the upload image panel has opened, click "Upload file" or drag and drop files from your local drive, or choose the other option, "Stock Images from Unsplash."
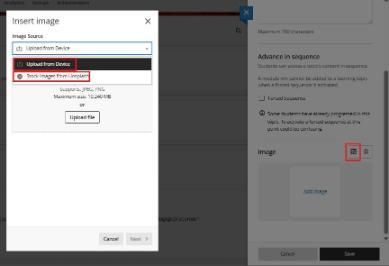
- Click next
- Preview and Reposition the Image
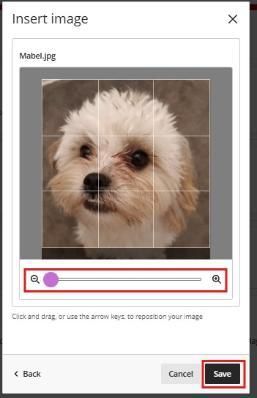
- Add Accessibility Settings. Mark the image as decorative or provide suitable alternative text, especially for students who use screen readers.
Once you have completed the above steps, the image will be added to the Learning Topic and will be visible to students when they access the Module Content page.
Release Conditions
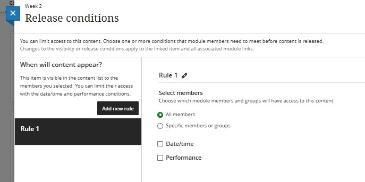
Use release conditions to define when students can view and access module content.

With release conditions, you can set a combination of these rules:
- Which module members or groups have access.
- When the module content is accessible, visible, and hidden using dates.
- What student performance is required, such as submitting an assignment or scoring above a grade/mark on a test.
Click to Learn more about Release Conditions from Blackboard
Adding Third-party tools like Panopto, Turnitin and Talis MyReadingList
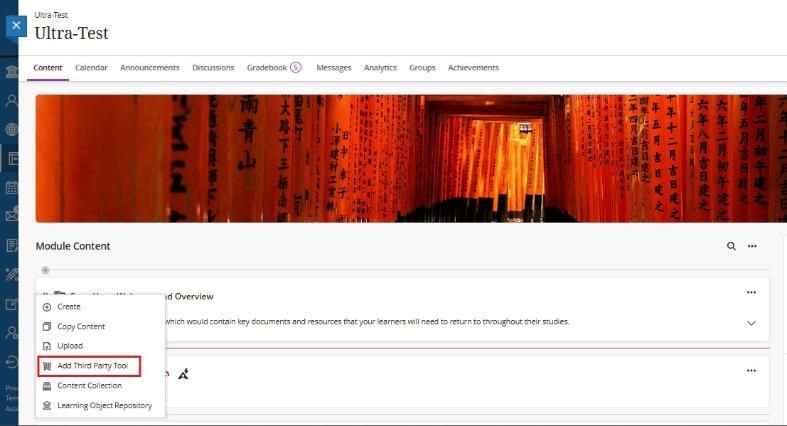
Click the purple plus icon wherever you want to add content; the icon will appear on any line within the Module Content area. Click on Add Third Party Tools.
Or
Go to Third Party Tools on the right-hand menu in your Blackboard Ultra Module.
Tallis Aspire MyReadlist
If you want to add Tallis Aspire MyReadlist, click on the ‘+’ icon anywhere in your main course content, select ‘Add Third Party Tool. ‘
When you see ‘Talis Aspire MyReading List ', please click on the ‘+’ icon to add to your content area.
Click to learn more about MyReading List
Panopto
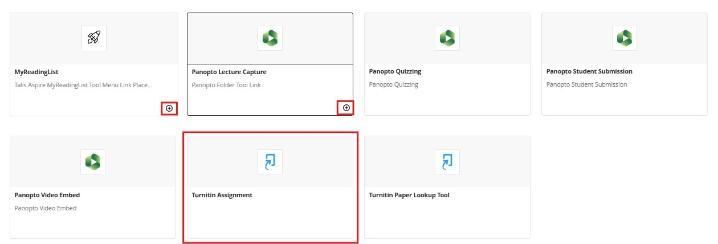
If you want to add Panopto, click on the ‘+’ icon anywhere in your main course content, select ‘Add Third Party Tool.
When you see ‘Panopto Lecture Capture ', please click on the ‘+’ icon to add to your content area.
Turnitin
If you want to add Turnitin, click on the ‘+’ icon anywhere in your main course content, select ‘Add Third Party Tool.
When you see ‘Turnitin Assignment', please click to add to your content area.
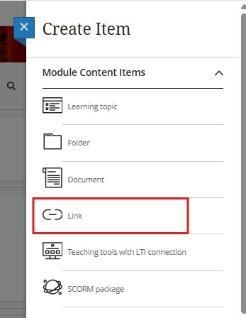
Adding Web Links
To add a link, select Create from the purple plus option on the Module Content page where you want your link to appear. This opens the Create Item panel. Select the Link option.
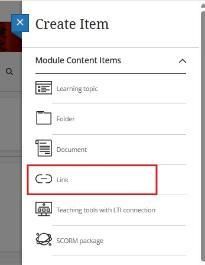
This opens a New Link page with two tabs:
- Create Web Link (for linking to websites external to a module)
- Create Module Link (for linking to content within a module)
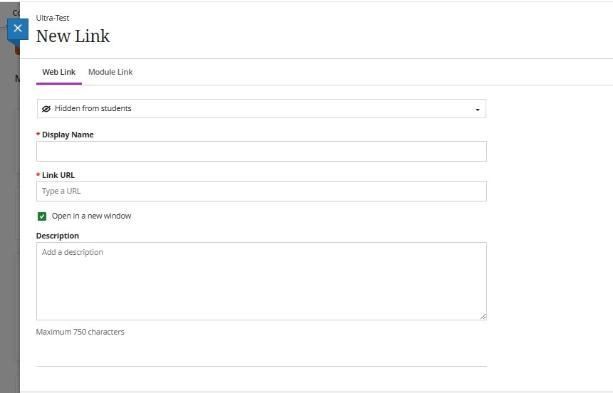
Make the following selections in the Create Web Link tab:
- Student visibility. Choose whether your new link should be visible to students.
- Display Name. Choose a display name for your new link.
- Link URL. Choose a URL to link to.
- Open in a new window. Web links allow you to choose whether you want your linked content to open in a new window. Opening links in a new window is generally considered best practice, especially for external websites.
- Description. Create a description or instructions for your students, limited to a maximum of 750 characters.
When complete, a web link appears on the Module Content page, accompanied by a link icon next to the display name.
Adding a Module Link
To add a link, select Create from the purple + option on the Module Content page where you want your link to appear. Select the Link option.
This opens a New Link page with two tabs:
- Create Web Link (for linking to websites external to a module)
- Create Module Link (for linking to content within a module)
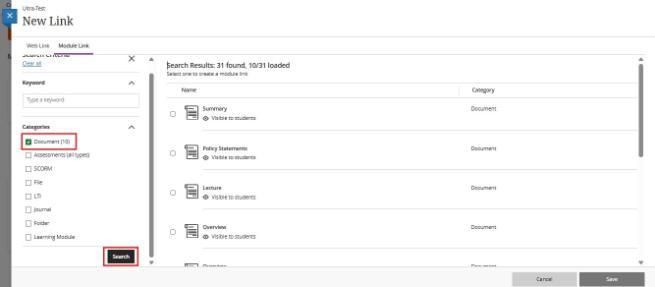
Make the following selections in the Create Module Link (for linking to content within a module)
- To search for the target content item, type a keyword. You can also select one or more checkboxes in the Categories list, which includes Document, Assessments (all types), SCORM, File, Journal, Folder and Learning Topic.
- Search to view search results. Select a content item from the list displayed. Once an item is selected, you can edit the display name or description. Note: Changing the display name or description on this page doesn't affect the target item's display name or description.
When complete, a link appears on the Module Content page with a link icon next to the display name.
Linking exceptions
You can create module links for most module materials and activities. Keep in mind these exceptions:
- You can't create module links for discussions and web links.
- You can't create module links to folders or learning modules within a folder or learning topic.
- You can’t use module links with learning topics where force sequence is enabled. This would allow users access to content they shouldn't have access to yet
- If a module link exists in a learning topic, it's not possible to enable force sequence.
Click to learn more about Module Link (for linking to content within a module)
Batch Edit
Content management is a time-consuming part of module setup and maintenance. Instructors spend valuable time carefully organising content and assessments, with specific due dates and release conditions.
You can use Batch Edit to update common settings across all content, such as visibility and due dates. You can also use the tool to delete a group of selected course content. With Batch Edit, you can control content settings in one place and all at once.
On the Module Content page, open the three-dot menu located above the content list on the right side. Select Batch Edit.

On the Batch Edit page, select the check box next to the items you want to update. You can choose individual content items, folders, and learning modules. To select all items at once, select the check box in the header at the top. You can select up to 100 items at a time. Items with long names are truncated.
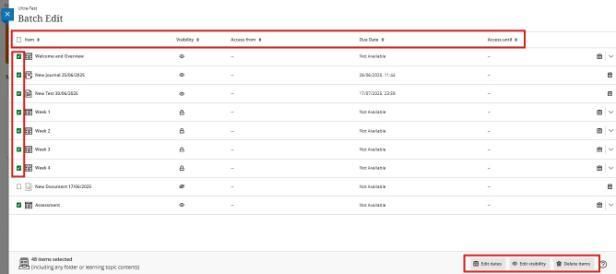
Edit dates
You can use Batch Edit to adjust due dates on items. Only items with dates will be adjusted. Select Edit dates at the bottom of the page.
You have four options for editing dates:
- Change dates by number of days
- Change dates based on the start date
- Change to a specific date and/or time
- Change the individual item date
Edit visibility
You can use Batch Edit to make items hidden or visible to students. Select Edit visibility. Choose to make items hidden or visible to students. Previous visibility settings for the items are overwritten. Date and time release conditions are removed for all selected items.
Delete item
You can use Batch Edit to delete items from the Course Content page. Select Delete items.
If students or staff are experiencing issues accessing Blackboard or specific modules, please contact the Teaching & Learning IT team via the IT Service Desk by one of the following methods.
You can email the service desk at itservicedesk@tcd.ie. Please ensure you fill in the 'Subject' field with Ultra: when emailing.
Service desk opening hours are:
Monday - Friday: 09:00 - 17:00